How to Draw Naruto Uzumaki Half-Face Chakra Portrait
Learn how to draw Naruto Uzumaki in a dramatic half-face anime portrait featuring spiky hair, a shinobi headband, one powerful eye, bold cheek marks, a spiral symbol, and flowing chakra energy.
In this drawing lesson, you will learn how to create a dramatic half-face portrait of Naruto Uzumaki. The composition is divided by a strong vertical line, with Naruto appearing on one side and a flowing spiral design on the other. This unusual layout gives the artwork a powerful and artistic appearance.
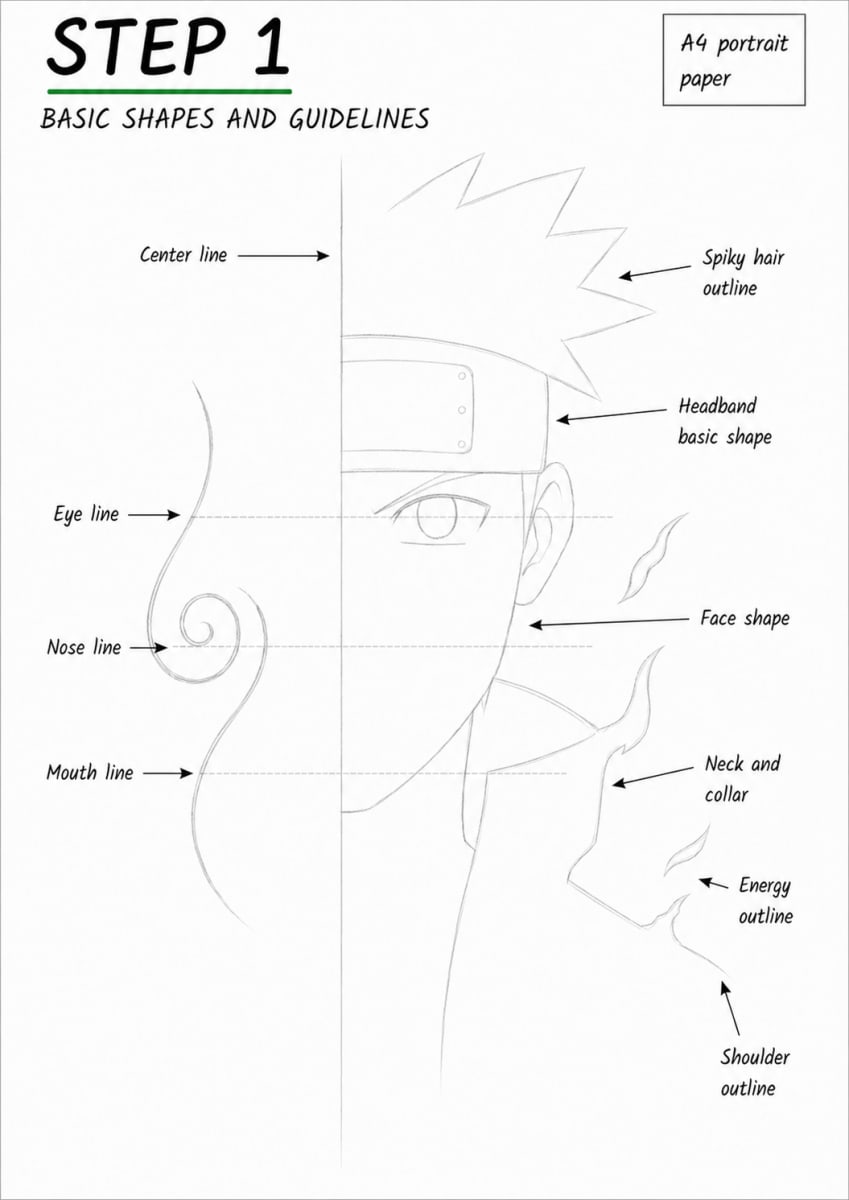
We will begin with light construction guidelines to establish the vertical split, facial proportions, spiky hair, headband, collar, shoulder, spiral, and chakra outline. We will then refine Naruto's visible eye, ear, mouth, cheek marks, and recognizable facial silhouette.
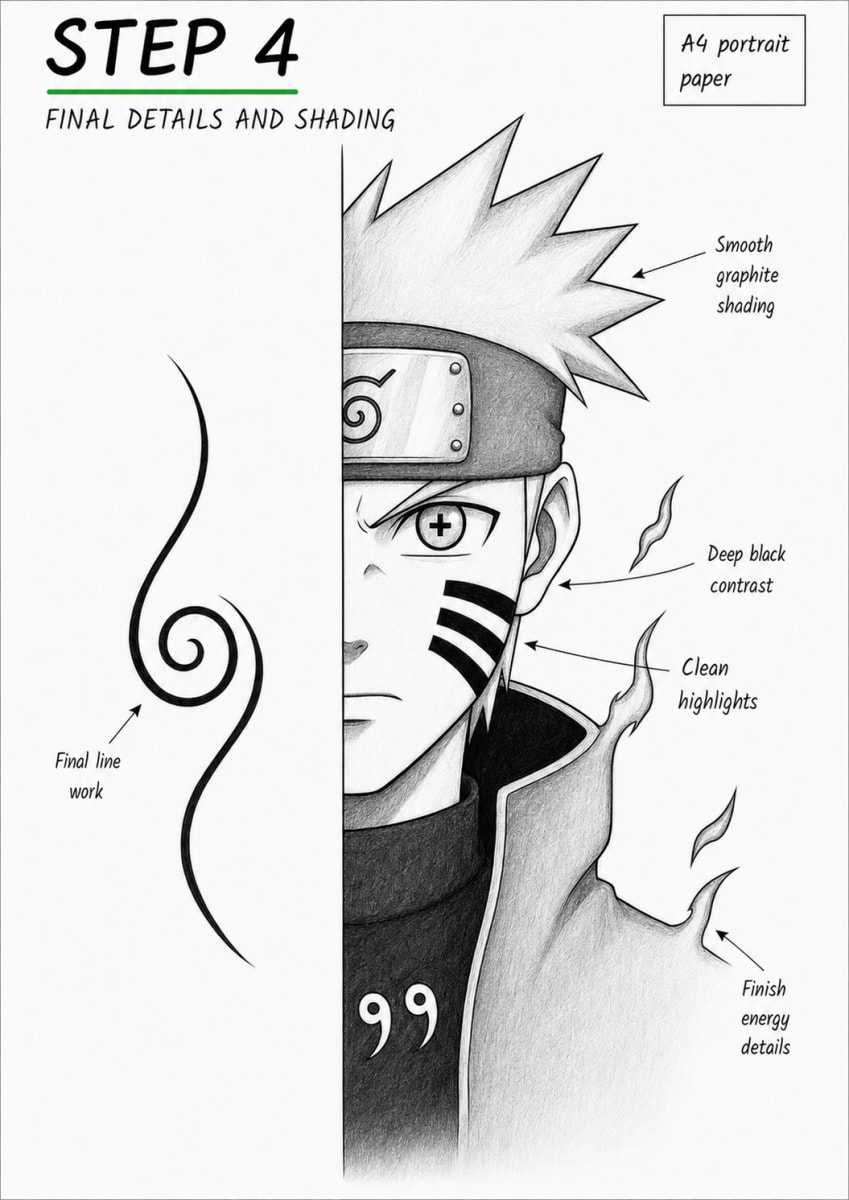
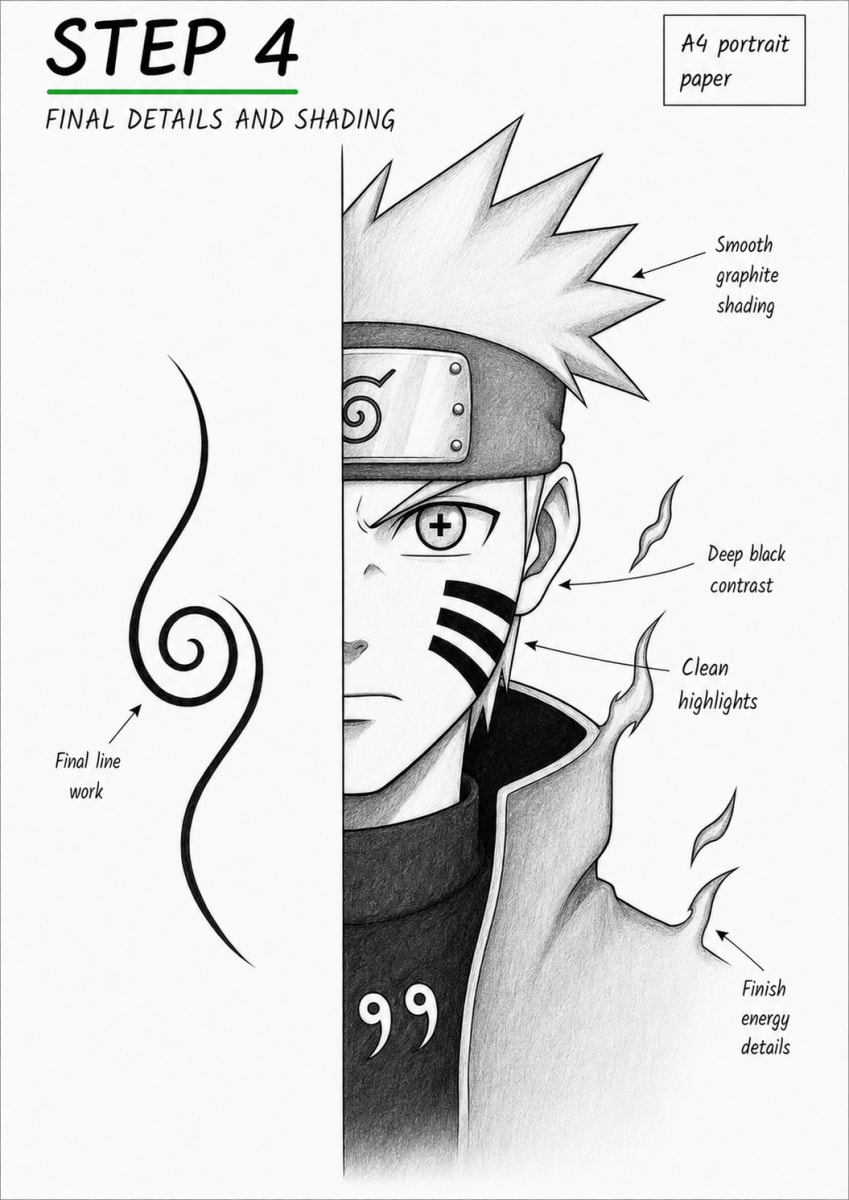
In the later steps, you will strengthen the line art, darken the important features, and add graphite shading to the headband, ear, collar, and clothing. The final stage introduces deep black contrast, smooth pencil texture, clean highlights, and finished chakra details.
Take your time with the visible eye and the central dividing line. Because only half of Naruto's face is shown, every feature must be placed carefully. The eye should look focused and intense, while the spiky hair, headband, cheek marks, and high collar should create a recognizable Naruto silhouette.
Tools Required
- 2H Pencil for light construction guidelines
- HB Pencil for sketching and refining shapes
- 2B Pencil for darker outlines and facial details
- 4B Pencil for deep shadows and clothing
- Fine-Liner Pen or dark pencil for final line art
- Blending Stump or tissue for smooth graphite shading
- Kneaded Eraser for highlights and corrections
- Ruler for the vertical dividing line
- A4 Drawing Paper
Step-by-Step Instructions
Build the Half-Face Guidelines and Basic Shapes
Focus: GuidelinesStart by drawing a straight vertical dividing line through the page. This line creates the half-face composition and separates Naruto's portrait from the flowing spiral design. Lightly sketch the visible side of Naruto's face, including the forehead, cheek, jaw, and chin. Add faint horizontal guidelines to position the eye, nose, and mouth correctly. Construct the large spiky hair silhouette above the head. Beneath the hair, draw the basic curved shape of the forehead protector and its rectangular metal plate. Add a simple ear shape beside the face. Continue downward with the neck, raised jacket collar, and shoulder direction. On the left side of the page, lightly draw the long flowing curve and central spiral. Finish this stage by placing the basic outer contours of the chakra flames. Keep every line light and simple. The goal is to establish the composition, proportions, and major shapes before adding detailed features.
Refine the Face, Headband, Spiral, and Chakra Shapes
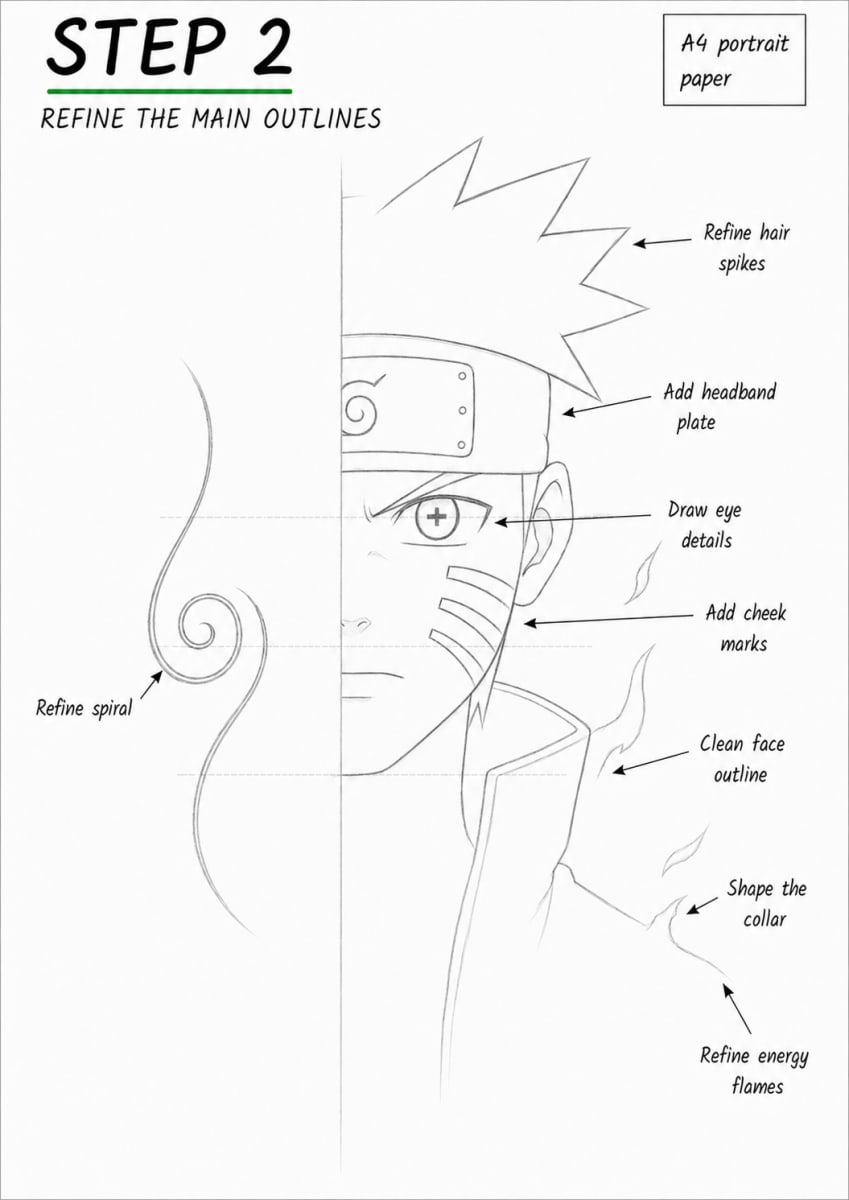
Focus: GuidelinesRefine the spiky hair outline by creating sharp points of different lengths. Keep the spikes energetic, but make sure they follow the shape established in Step 1. Develop the forehead protector by cleaning the cloth band and metal plate. Add the corner rivets and draw the spiral leaf emblem on the plate. Draw Naruto's visible eye beneath the headband. Add the upper eyelid, iris, pupil, and the plus-shaped detail shown in the reference. Refine the eyebrow to give Naruto a focused expression. Add the nose mark, calm mouth, inner ear curves, jawline, and three cheek marks. Clean the neck and raised collar shapes, then refine the shoulder and chakra-flame outlines. On the left side, strengthen the spiral and its surrounding flowing curve. Check the placement of every feature before moving on to darker line work.
Ink the Main Outlines and Add the First Shading
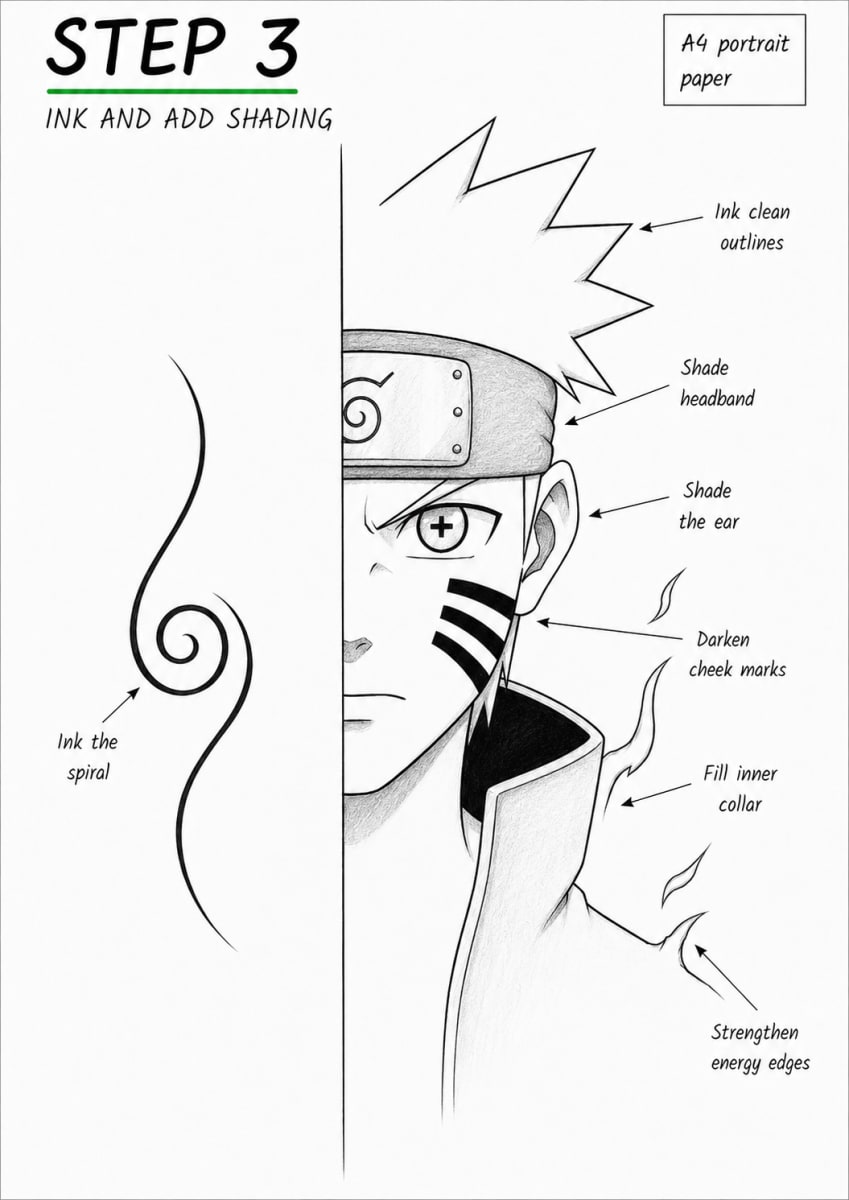
Focus: GuidelinesErase most of the construction guidelines, leaving only the clean shapes needed for the final drawing. Ink the central dividing line and strengthen Naruto's hair, headband, face, ear, jaw, collar, shoulder, spiral, and chakra edges. Darken the eyebrow, eye outline, pupil, and three cheek marks. Use confident black lines around the important facial features while keeping the nose and mouth softer. Add light graphite shading to the forehead protector, metal plate, ear, neck, and outer collar. Fill the inside of the raised collar with deep black to create strong contrast beside the face. Ink the flowing curve and spiral on the left side with a smooth, consistent line. Strengthen the chakra flames, but keep their interiors mostly light. Do not completely finish the jacket or all the shadows yet. This stage should look polished but still leave room for the final graphite texture and darkest values.
Complete the Final Shading, Contrast, and Chakra Details
Focus: GuidelinesComplete the drawing by strengthening the final line art around the hair, headband, eye, ear, face, collar, shoulder, spiral, and chakra shapes. Make sure the vertical dividing line remains straight and clean. Build smooth graphite shading across the headband cloth, metal plate, hair edges, ear, neck, collar, and jacket. Use gradual pencil pressure so the lighter and darker areas blend naturally. Deepen the black areas inside the collar and across the lower garment. Add the two small white comma-shaped symbols over the dark clothing, matching the final composition. Keep Naruto's face relatively light so the visible eye and solid-black cheek marks remain the main focus. Use the eraser to restore clean highlights on the face, headband plate, collar edges, and clothing. Finish the small floating chakra shapes and clean the outer flame contours. Carefully erase remaining unwanted marks. The completed portrait should have crisp line work, visible graphite texture, deep black contrast, and a balanced half-face composition.
Is this Naruto half-face drawing tutorial suitable for beginners?
The guide is best suited to intermediate artists because it requires accurate half-face proportions, controlled line weight, detailed graphite shading, and strong contrast. Beginners can still follow it by keeping their construction lines light and completing one section at a time.
How do I keep Naruto's half-face portrait balanced?
Begin with a straight vertical dividing line and build the visible side of the face around it. Keep the eye, nose, mouth, ear, hair, neck, and collar aligned with the original guidelines. The spiral on the opposite side should visually balance Naruto's portrait.
How can I make Naruto's visible eye look focused?
Use a sharp upper eyelid, a slightly lowered eyebrow, and a clearly defined iris and pupil. Keep the mouth small and calm so the eye carries most of the expression.
How should I draw Naruto's spiky hair?
Begin with the large outer silhouette and divide it into sharp spikes of different lengths. Point the spikes upward and outward, but avoid making every spike identical. Refine the shape before adding any shading.
Where should I add shading in this Naruto portrait?
Shade the headband cloth, metal plate, inner ear, neck, collar, and clothing. Use the darkest values inside the raised collar, on the cheek marks, and across the lower garment. Keep the face lighter so the eye remains the focal point.
How do I create smooth graphite shading?
Build the shading gradually with light pencil layers. Use a blending stump or tissue to soften transitions, then restore highlights with a kneaded eraser. Avoid pressing too hard at the beginning.