How to Draw Naruto Shouting Front View
Learn how to draw Naruto Uzumaki shouting or laughing in a front-facing anime portrait with spiky hair, Leaf Village headband, whisker marks, wide open mouth, and energetic expression.
In this lesson, we are going to draw Naruto Uzumaki from the front view with his mouth wide open, like he is shouting, laughing, or calling out with full energy. This portrait is all about expression. Naruto should not look calm here. He should feel loud, excited, and full of life.
We will begin with simple head guidelines so the face stays balanced. Then we will place the headband, closed smiling eyes, small nose, ears, and wide open mouth. After that, we will build the spiky hair, add the cheek whisker marks, and shape the high collar. In the final step, we will clean the line art and add shading to the headband, mouth, neck, and jacket.
Take your time with the mouth and headband. The big open mouth gives Naruto his energy, while the headband and whisker marks make him instantly recognizable. Keep your early lines light, check the symmetry often, and only darken the final outline when the expression feels right.
Tools Required
- 2H Pencil for light guidelines
- HB Pencil for sketching
- 2B Pencil for darker line work
- 4B Pencil for mouth
- headband
- and neck shading
- Fine-Liner Pen or dark pencil for final outline
- Blending Stump or tissue
- Kneaded Eraser
- Ruler
- A4 Drawing Paper
Step-by-Step Instructions
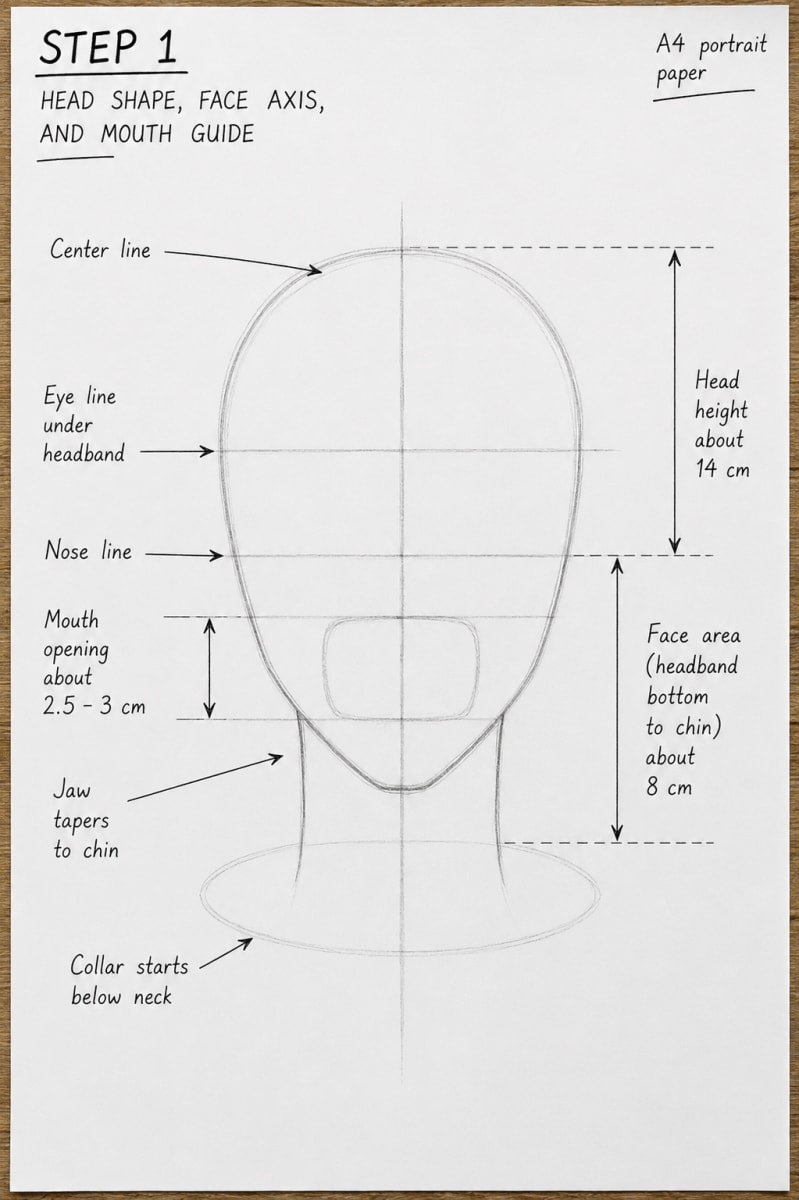
Build the Head Shape, Face Axis, and Mouth Guide
Focus: GuidelinesStart with a light oval for Naruto's head. Use a 2H pencil and draw softly because these first lines are only construction lines. Add a vertical center line down the middle of the face, then place the eye line slightly below where the headband will sit. Next, sketch the lower face and jaw. Naruto's chin should be rounded but not too wide. Since this portrait has a big shouting or laughing mouth, draw a large mouth guide in the lower half of the face. Keep it centered on the vertical line. The mouth opening should feel wide and energetic, about 2.5 to 3 cm tall on A4 paper. Add simple neck lines and the first collar shape below the head. Before moving forward, check that the face is balanced, the mouth sits in the center, and the jaw still feels symmetrical. If the mouth is crooked now, it will be harder to fix after the line art.
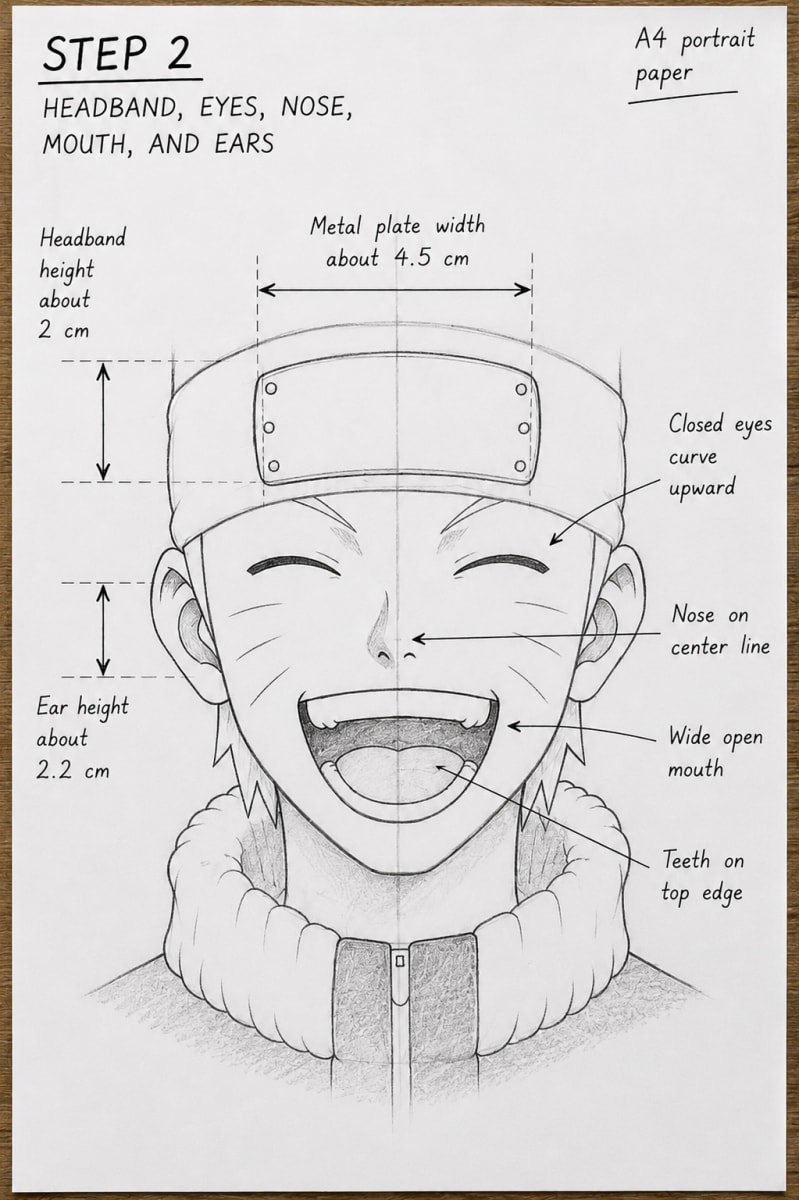
Place the Headband, Closed Eyes, Nose, Mouth, and Ears
Focus: FaceNow we add Naruto's main facial features. Start with the headband. Draw the cloth band across the forehead, then place the metal plate in the center. Keep the plate slightly curved so it follows the roundness of the head. Leave space in the middle for the Leaf Village symbol. Draw the closed eyes as curved lines that lift upward slightly. This makes Naruto look like he is laughing or shouting with excitement. Place the small nose on the center line, then build the open mouth using your guide from Step 1. Add the upper teeth along the top edge of the mouth and place the tongue in the lower half. The inside of the mouth should be left ready for dark shading later. Add the ears on both sides of the head, roughly from the eye area down toward the nose and mouth zone. Keep the features lively, but do not overcomplicate them. Naruto's expression works best when the eyes are simple and the mouth carries most of the energy.
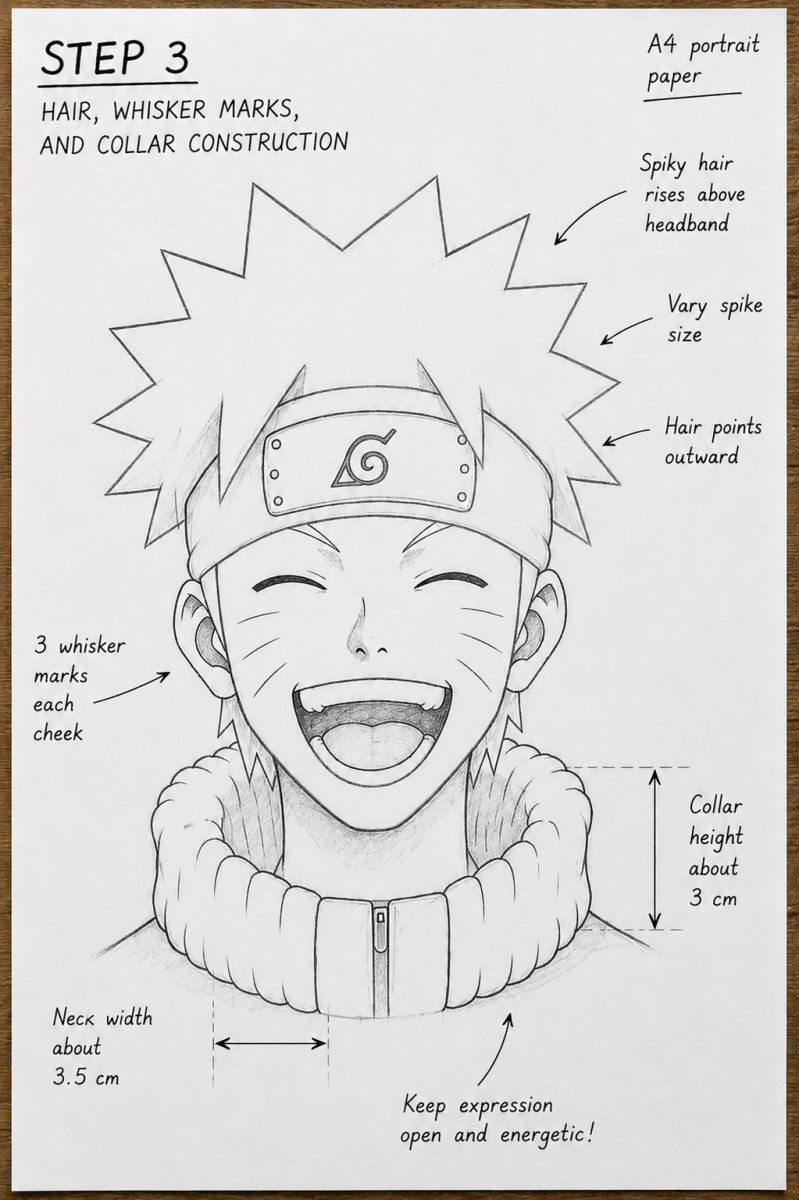
Add the Spiky Hair, Whisker Marks, and Collar Construction
Focus: HairNow we build Naruto's silhouette. Start with the spiky hair above and around the headband. The spikes should point upward and outward, with different lengths so they do not look copied and repeated. Keep the headband visible because it is one of the most important parts of the character design. Add three whisker marks on each cheek. Keep them angled slightly outward and make sure both sides feel balanced. These marks should sit beside the mouth and under the closed eyes, not too high on the face. Now refine the neck and jacket collar. Naruto's collar is thick and soft, so use rounded shapes instead of sharp straight lines. Sketch the center zipper area and the shoulder direction lightly. At this stage, you should see the full Naruto expression clearly: spiky hair, headband, whisker marks, and the big open shouting mouth.
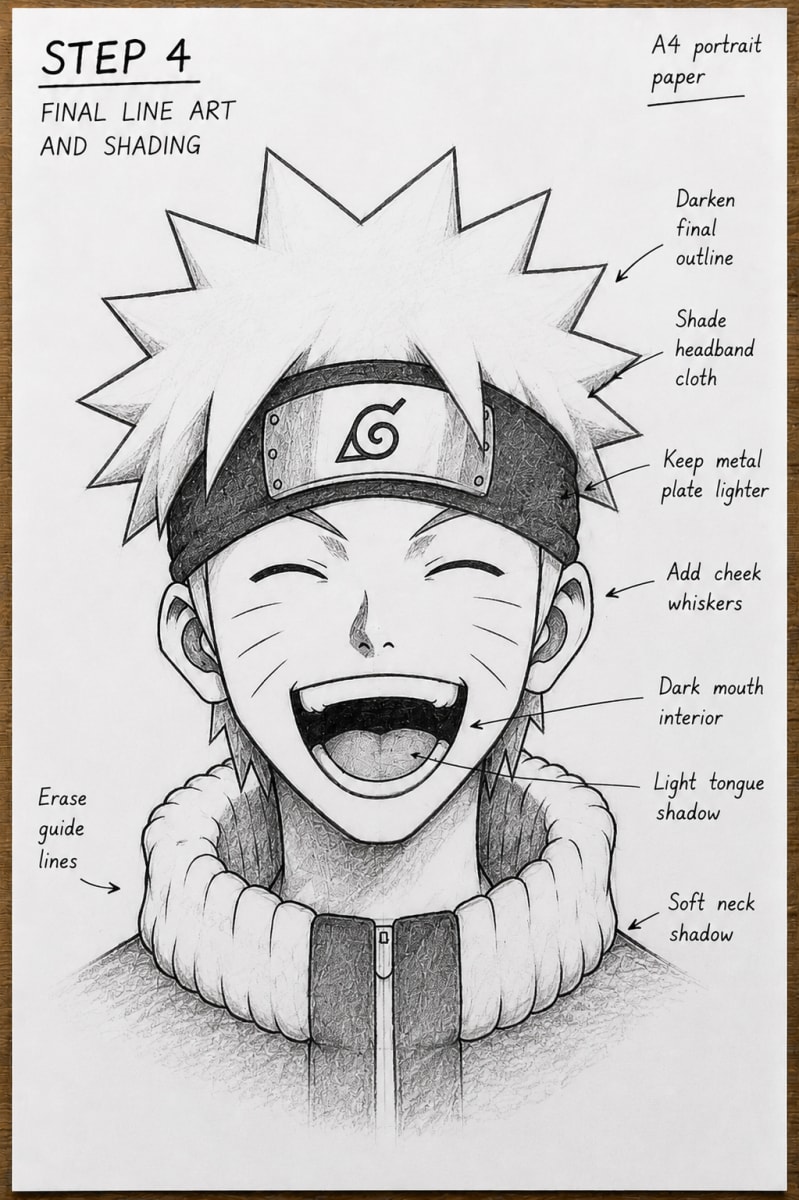
Clean the Final Line Art and Add Shading
Focus: ShadingIn the final step, darken the clean outline. Strengthen the hair spikes, headband edges, ears, face shape, mouth, collar, and shoulders. Draw the Leaf Village symbol clearly on the metal plate, but keep the plate lighter than the cloth band so it still looks metallic. Shade the headband cloth darker, especially on the side sections. Fill the inside of the mouth with a dark value, leaving the teeth clean and bright. Add a softer shadow on the tongue so it sits inside the mouth instead of looking flat. Then shade under the chin, along the neck, and inside parts of the collar. Finish by cleaning the construction lines with a kneaded eraser. Keep Naruto's expression open and energetic. The final drawing should feel like he is shouting, laughing, or calling out with confidence, while still keeping the face balanced and recognizable.

Is this Naruto shouting drawing tutorial good for intermediate artists?
Yes. This guide is best for intermediate artists because we work on a big open-mouth expression, a centered headband, spiky hair, cheek whisker marks, clean line art, and controlled shading. The structure is simple, but the expression needs careful balance.
How do I make Naruto's mouth look open and energetic?
Start with a large centered mouth guide before drawing the final shape. Keep the upper teeth clean, place the tongue in the lower half, and shade the mouth interior dark. The mouth should be wide, but it still needs to stay balanced on the center line.
How do I draw Naruto's headband correctly?
Draw the cloth band first, then place the metal plate in the center of the forehead. The plate should follow the curve of the head slightly. Keep the Leaf Village symbol centered and shade the cloth darker than the metal plate.
Where should I place Naruto's whisker marks?
Place three whisker marks on each cheek, under the closed eyes and beside the mouth. Angle them slightly outward and keep both sides balanced. Do not place them too high or too close to the nose.
Where should I add shading in this Naruto portrait?
Add darker shading inside the mouth and on the headband cloth. Use softer shading under the chin, on the neck, and inside the collar. Keep the teeth and metal plate lighter so the face stays clear.