How to Draw Monkey D. Luffy with a Straw Hat
Learn how to draw Monkey D. Luffy wearing his iconic straw hat in four simple pencil-drawing steps.
Learn how to draw Monkey D. Luffy from One Piece in a three-quarter-view pencil portrait. This four-step tutorial covers the basic head construction, facial features, straw hat, pointed hair, sleeveless clothing, graphite shading, and final contrast. The lesson is suitable for beginners who want to practice clean anime proportions and controlled pencil shading.
Tools Required
- 2H Pencil for light construction lines
- HB Pencil for sketching and clean outlines
- 2B Pencil for general shading
- 4B Pencil for the black hair and darkest shadows
- Blending Stump or tissue
- Kneaded Eraser
- Regular Eraser
- A4 Drawing Paper
Step-by-Step Instructions
Build the Head, Hat, and Body Guidelines
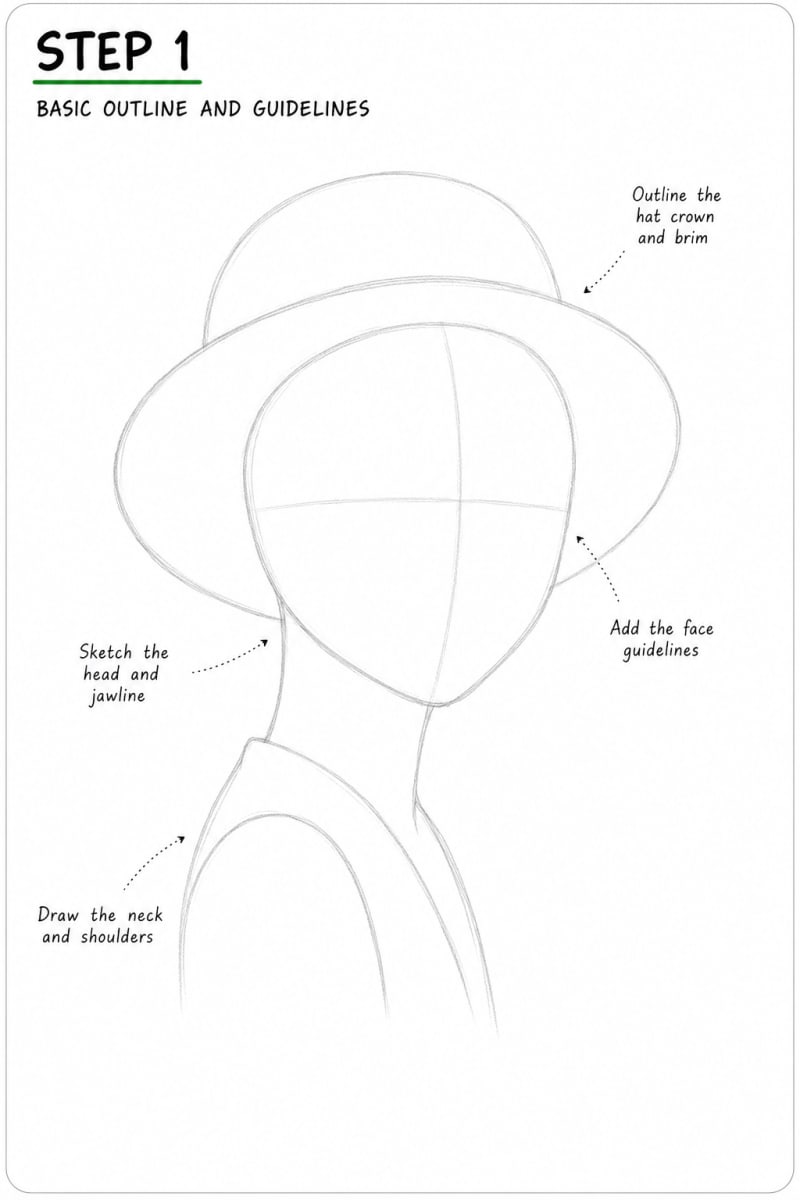
Focus: GuidelinesBegin with a light oval for Luffy's head and shape the lower section into a gently pointed jaw. Add a curved vertical center line to establish the three-quarter viewing angle, followed by a horizontal eye guideline across the face. Keep these construction lines very light so they can be erased later. Outline the straw hat using a large curved brim around the head. Add the rounded crown above it, making sure both parts follow the angle of the face. The brim should extend beyond the head on both sides without becoming perfectly symmetrical because the portrait is turned slightly. Finish the construction by drawing the neck below the jaw and establishing the visible shoulder and upper body. Add the basic opening of the sleeveless shirt, but do not add facial features, hair, or shading yet. Check the overall pose and proportions before continuing.
Add the Facial Features, Hair, Hat Band, and Clothing
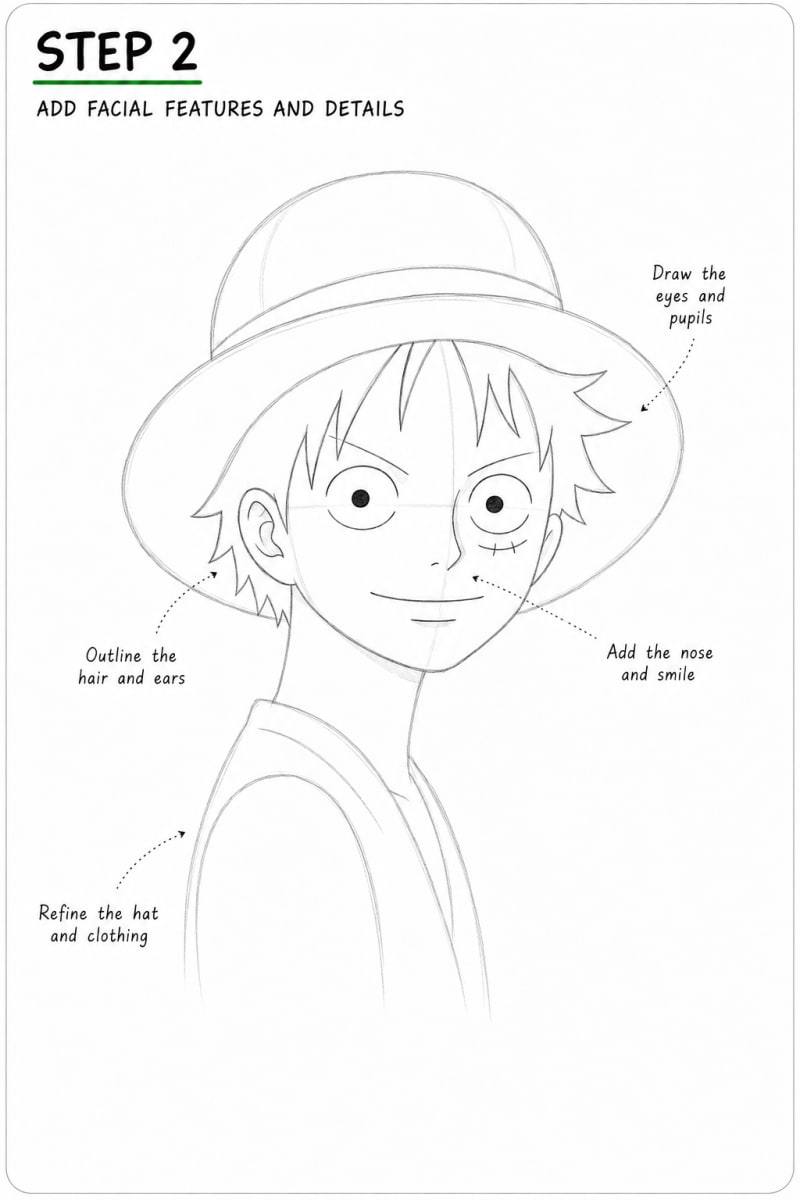
Focus: GuidelinesUse the guidelines to place Luffy's large circular eyes. Because the head is shown at an angle, adjust the eye sizes and spacing to follow the face rather than making them perfectly identical. Add the dark pupils, simple curved eyebrows, small nose, smiling mouth, and short line beneath the lower lip. Draw the small curved scar beneath the eye on the viewer's right. Add the visible ears and outline the pointed sections of hair emerging from beneath the straw hat. Keep the hair shape clean and make each point follow the direction shown in the finished portrait. Refine the crown and brim of the straw hat, then add its dark horizontal band. Clean up the jawline, neck, shoulder, and sleeveless-shirt opening. Leave the facial guidelines faintly visible until all the features look correctly positioned.
Add Shading and Pencil Depth
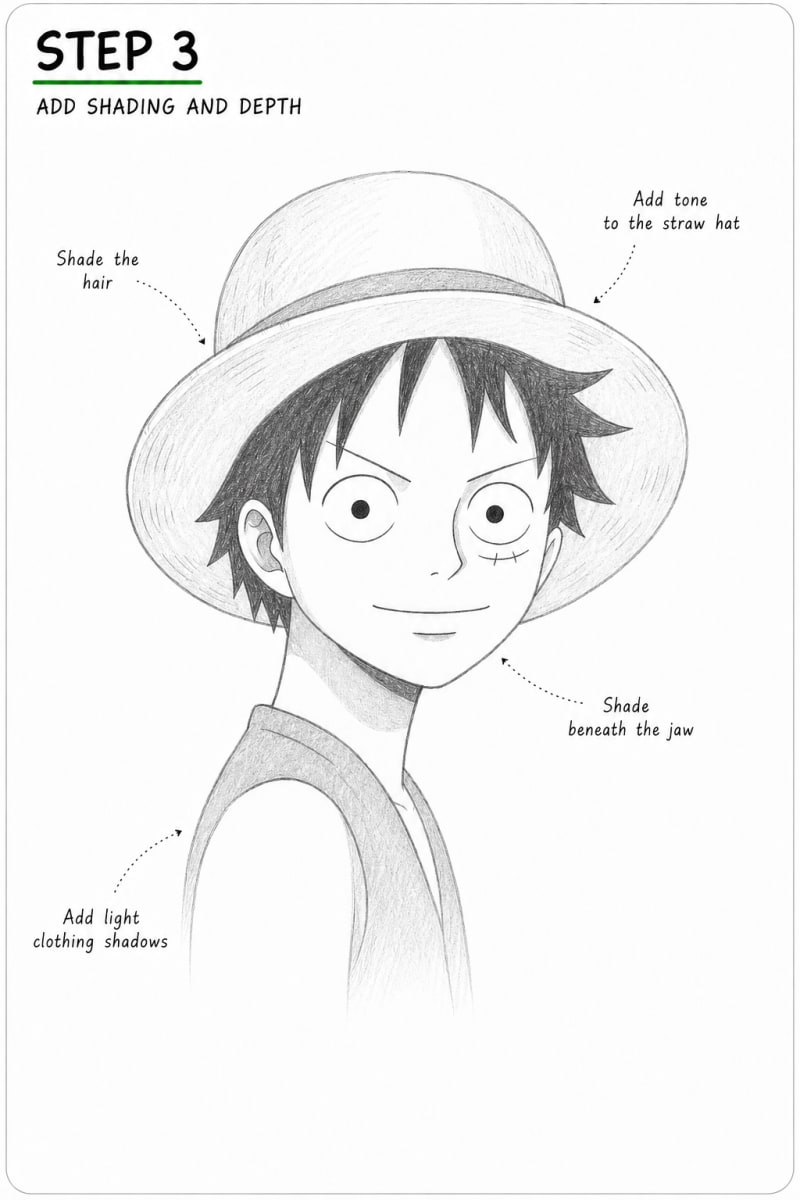
Focus: ShadingErase or soften the remaining construction guidelines and begin adding graphite values. Shade Luffy's hair with an even dark tone, keeping the pointed silhouette crisp. At this stage, the hair can remain slightly lighter than its final black value so it can be deepened during the last step. Use light pencil strokes to create texture across the crown and brim of the straw hat. Darken the hat band and add a soft shadow beneath the brim where appropriate. Shade the inside of the visible ear while keeping the face mostly clean and bright. Add a clear cast shadow beneath the jaw and along the side of the neck. Apply a light, even graphite tone to the sleeveless shirt. Build the shading gradually instead of pressing hard immediately, and preserve the light areas that separate the face from the darker hair and clothing.
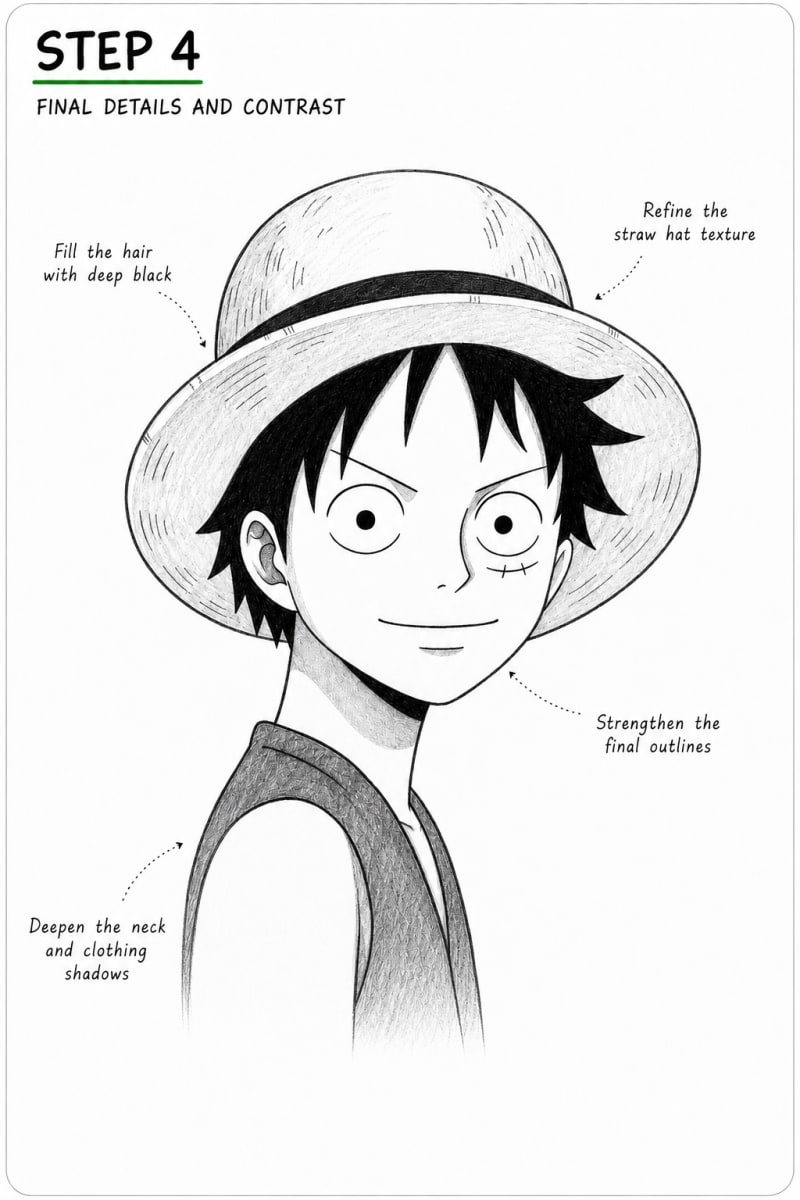
Deepen the Black Hair and Refine the Final Contrast
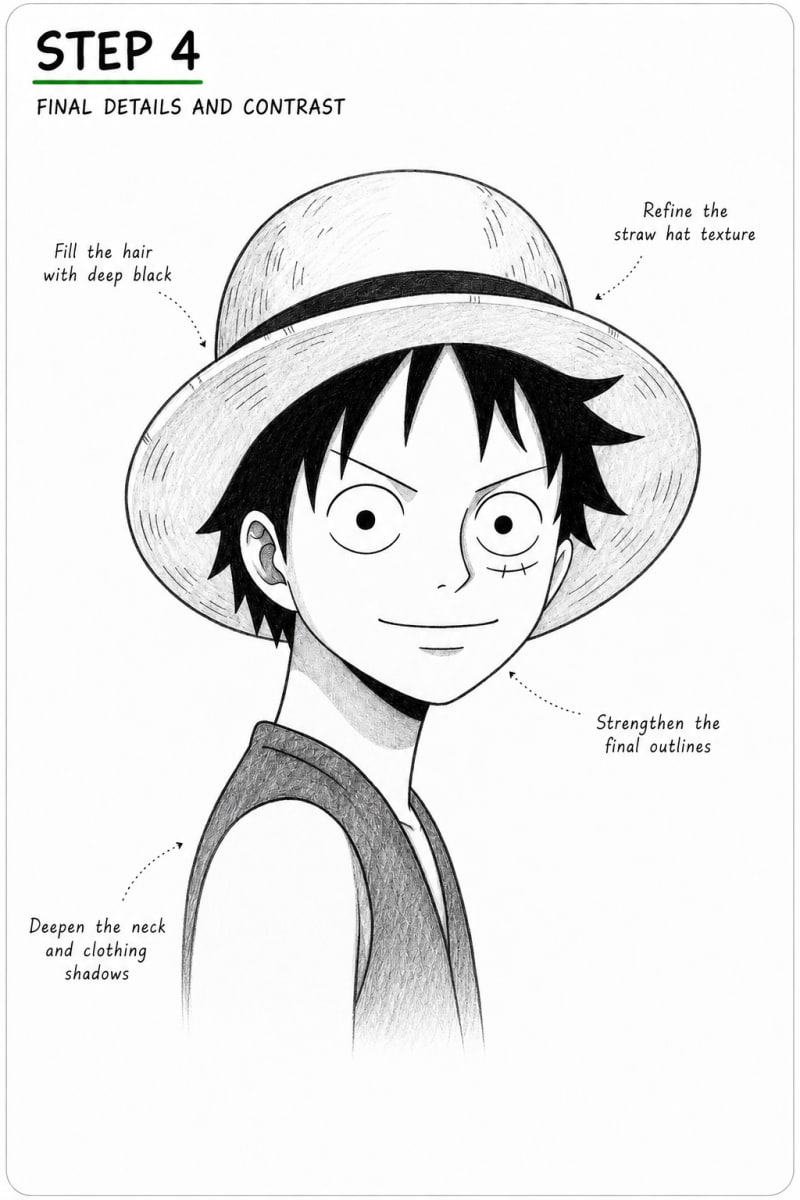
Focus: GuidelinesFinish the drawing by filling every visible section of Luffy's hair with strong, rich black graphite. Use a 4B pencil for the darkest value and work carefully around the face, ears, hat brim, and individual hair points. The finished hair should appear nearly solid black while retaining a subtle pencil texture. Strengthen the final outlines around the hat, hair, face, eyes, ears, neck, shoulder, and clothing. Refine the straw texture with short controlled strokes, then deepen the hat band so it clearly separates the crown from the brim. Increase the dark shadow beneath the jaw and refine the lighter transition across the neck. Add more contrast to the sleeveless shirt while leaving the exposed shoulder unshaded. Clean the face and surrounding paper with a kneaded eraser, making sure the eyes, smile, scar, and hat remain clear and recognizable.
Is this Luffy drawing tutorial suitable for beginners?
Yes. The portrait is divided into four clear stages: construction, facial details, basic shading, and final contrast. Beginners should keep the first guidelines light and check the proportions before adding darker pencil work.
How do I draw Luffy's face at a three-quarter angle?
Curve the vertical center line in the direction the head is facing and place the facial features around it. Avoid treating both sides of the face as perfectly symmetrical because the turned angle changes the visible spacing.
How do I make Luffy's hair look strongly black?
Build an even base with a 2B pencil and deepen it with a 4B pencil during the final step. Fill every hair section consistently, keep the pointed edges sharp, and avoid leaving accidental white gaps.
How should I draw the straw hat?
Construct the crown and brim as separate curved shapes that follow the angle of the head. Add the horizontal hat band, keep the brim wider than the face, and use short light pencil strokes to suggest the straw texture.
Where should I add shading in this Luffy portrait?
Use the darkest values in the hair and hat band. Add medium shading inside the ear, beneath the jaw, along the neck, and across the sleeveless shirt. Keep the face and exposed shoulder comparatively light.
When should I erase the construction guidelines?
Keep the guidelines visible while positioning the facial features in Step 2. Lightly erase them before adding the main shading in Step 3, then clean any remaining marks after completing the final outlines.