How to Draw Killua Zoldyck's Prodigious Assassin Front View
Learn how to draw Killua Zoldyck in a front-facing anime portrait with sharp eyes, spiky white hair, a narrow face shape, clean line art, and soft pencil shading.
In this lesson, we are going to draw Killua Zoldyck from the front view, focusing on the calm but intense look that makes him so recognizable. This portrait is not only about copying the hair and eyes. We are building the face carefully so the expression feels focused, quiet, and strong.
We will start with light face guidelines, then place the eyes, ears, nose, and mouth with clear spacing. After that, we will build Killua's spiky white hair around the skull, keeping the hair full without covering the eyes too much. In the final step, we will clean the line art and add soft pencil shading under the bangs, behind the side hair, under the chin, and along the neck.
Take your time with this one. Killua looks simple at first, but the drawing depends on balance: both eyes need to sit level, the chin should stay narrow, and the hair spikes should feel messy but controlled. If you follow each step slowly, you will finish with a clean front-facing Killua portrait that captures his assassin training, quiet confidence, and softer human side.
Tools Required
- 2H Pencil for construction guidelines
- HB Pencil for the main sketch
- 2B Pencil for darker facial lines
- 4B Pencil for soft shading
- Fine-Liner Pen or dark pencil for final line art
- Blending Stump or tissue
- Kneaded Eraser
- Ruler
- A4 Drawing Paper
Step-by-Step Instructions
Set Up the Front View Face Guidelines
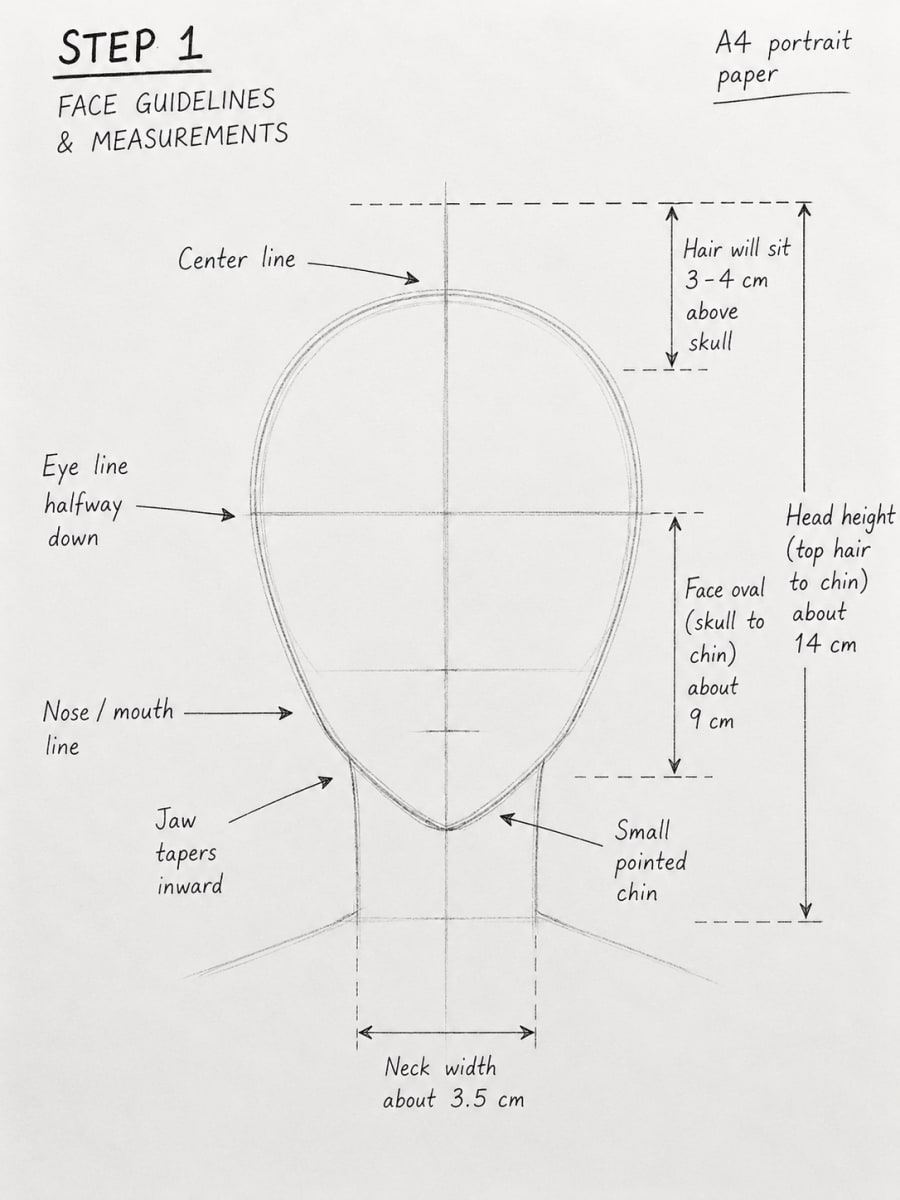
Focus: GuidelinesStart with a light oval for Killua's head. Use a 2H pencil and keep the pressure soft, because these construction lines will be erased later. Draw a vertical center line straight through the face, then place the horizontal eye line about halfway down the face oval. Shape the lower face with a soft jaw that tapers toward a small pointed chin. Killua's face is youthful, so avoid making the jaw too square or heavy. Add a lower guide line for the nose and mouth area, then sketch two light neck lines under the chin. The neck should be narrow, about half the width of the head. Before you move forward, check the balance. The center line should split the face evenly, the eye line should be level, and the chin should sit directly below the center line. If this first structure is clean, the eyes and hair will be much easier to place.
Place the Eyes, Ears, Nose, and Mouth
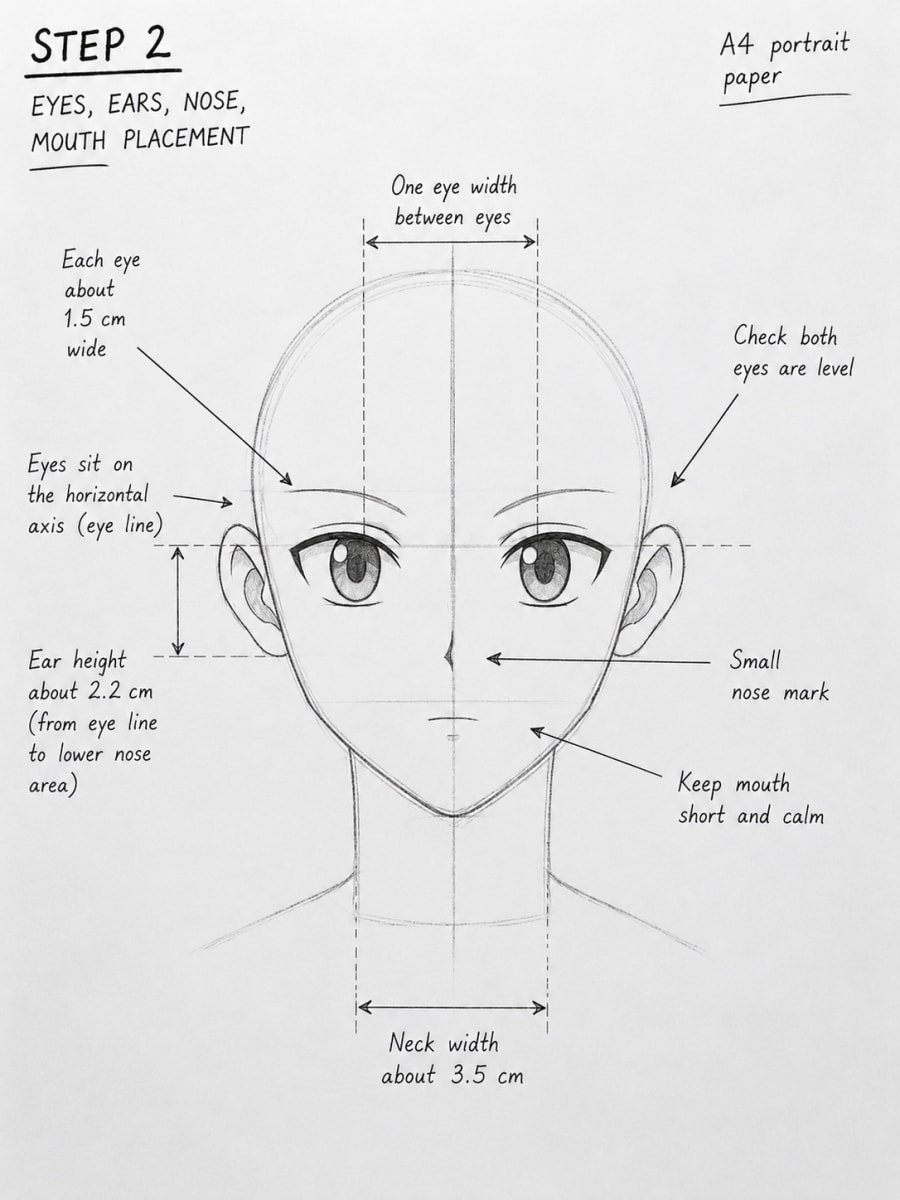
Focus: EyesNow we will place Killua's facial features. Draw the eyes directly on the horizontal eye line. Keep both eyes the same height and leave about one eye width between them. The eyes should look sharp and focused, not wide or surprised, so keep the upper eyelids slightly stronger than the lower eyelids. Add the irises and pupils inside the eyes, leaving small clean highlights. These highlights are important because they give the gaze life. Next, place the ears on both sides of the head. The ears should sit roughly from the eye line down toward the lower nose area. Draw the nose as a small simple mark on the center line. Then add a short, calm mouth under it. Keep the expression serious but quiet. This is where Killua's determined look begins to appear, so do not overdraw the mouth or make the eyebrows too dramatic.
Build Killua's Spiky White Hair and Collar Shape
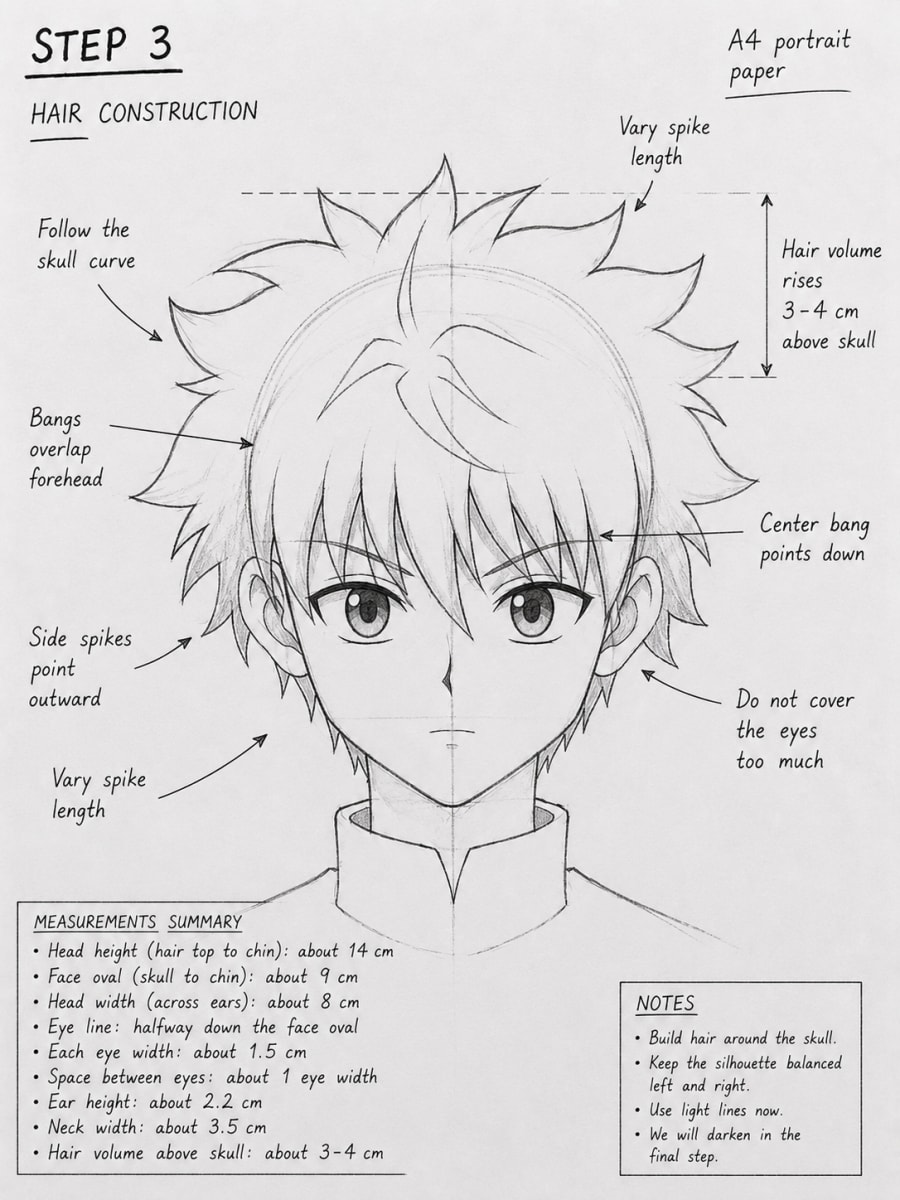
Focus: HairNow we add the part that makes Killua instantly recognizable: his spiky white hair. Do not draw the hair flat against the skull. Let the hair rise above the head guide by about 3 to 4 cm. Start with the front bangs, letting a few pointed locks fall toward the eyes and forehead. Build the side spikes around the ears, then add the top spikes. Vary the length and direction of each hair clump. Some spikes should point upward, some outward, and some slightly downward near the sides. This keeps the hair natural instead of looking like repeated triangles. After the hair shape feels balanced, sketch the neck and collar. Keep the collar simple and clean so it supports the portrait without stealing attention from the face. At this stage, the construction lines can still show lightly. We are checking the full silhouette before darkening the final lines.
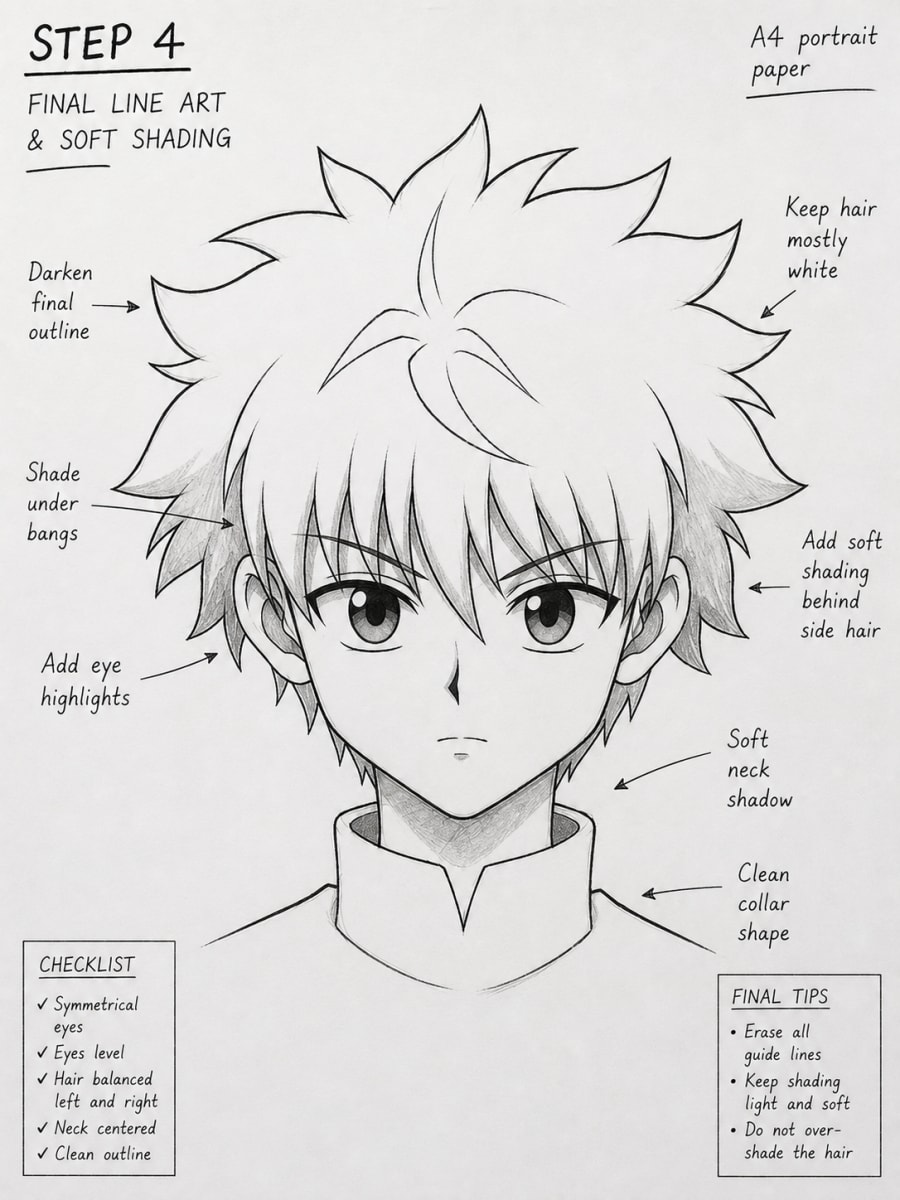
Clean the Line Art and Add Soft Pencil Shading
Focus: ShadingIn the final step, clean the drawing with darker confident lines. Strengthen the outline around the hair, eyes, jaw, ears, neck, and collar. Keep the upper eyelids darker because that helps Killua's gaze feel sharper. Do not darken every line equally. The drawing will look better if the eyes, hair edges, and chin have slightly stronger line weight. Add soft shading under the bangs, behind the side hair, inside the ears, under the chin, and down the neck. Keep most of the hair bright because Killua's hair is white. Use light pencil strokes first, then blend gently with a tissue or blending stump. Darken the pupils, protect the eye highlights, and clean the face with a kneaded eraser. The final portrait should feel calm, focused, and intense. We want the viewer to recognize Killua through the sharp eyes, messy white hair, narrow chin, and quiet assassin-like expression.

Is this Killua drawing tutorial good for intermediate artists?
Yes. This lesson is best for intermediate artists because we are practicing balanced anime proportions, matching both eyes, layered spiky hair, clean line art, and soft pencil shading. If you already understand basic face guidelines, this guide will help you make your anime portrait cleaner and more expressive.
How do I make Killua's eyes look sharp and focused?
Keep both eyes level on the horizontal eye line, make the upper eyelids slightly darker, and avoid making the pupils too large. Small highlights inside the eyes will keep the gaze alive while still looking calm and determined.
How should I draw Killua's spiky white hair?
Build the hair in separate clumps instead of drawing one flat outline. Let the hair rise above the skull, bring a few bangs down toward the eyes, and vary the direction of the side and top spikes. Keep most of the hair white with only light shadow where clumps overlap.
Why does my Killua drawing not look like him?
Most problems come from the eye placement, chin width, or hair shape. Check that the eyes are level, the chin is narrow, and the hair has enough volume above the head. Killua's face should look soft but focused, not too wide or too angry.
Where should I add shading in this Killua portrait?
Add shading under the bangs, behind the side hair, inside the ears, under the chin, and along the neck. Keep the shading light and controlled. The face should stay clean, and the white hair should not become too dark.