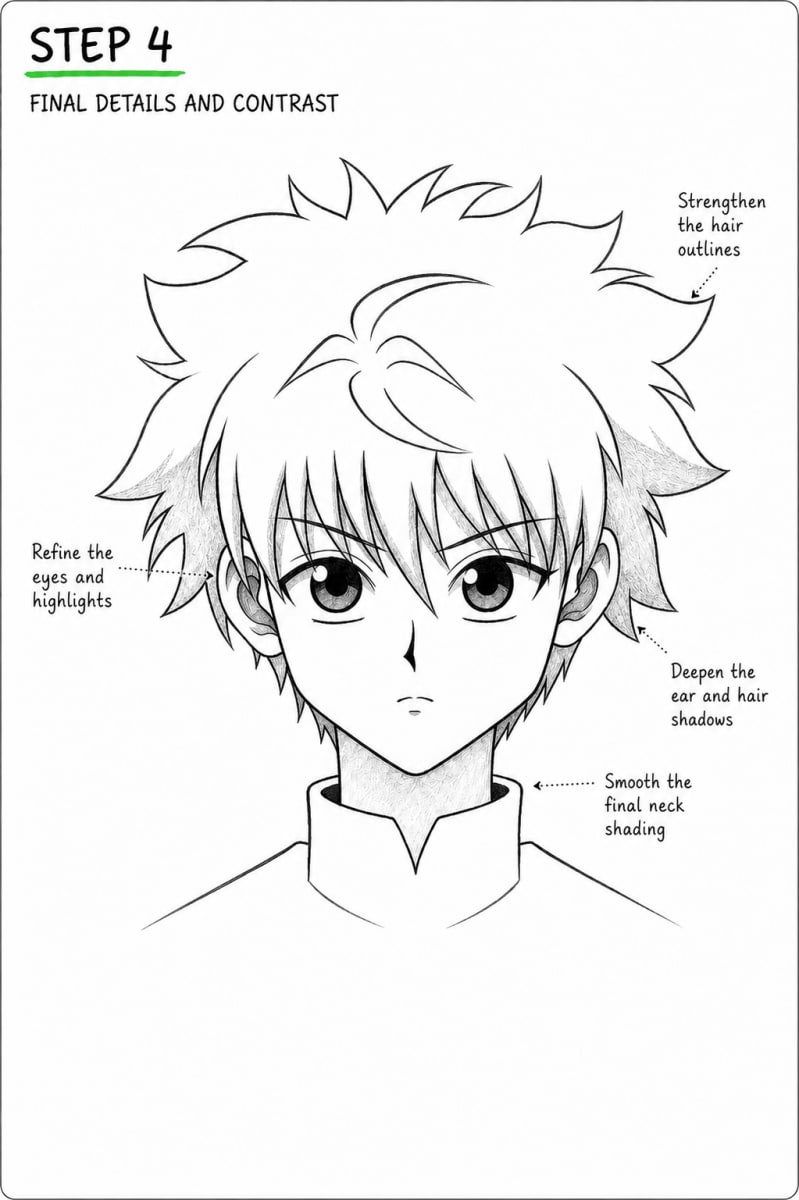
How to Draw Killua Zoldyck Front View
Learn how to draw Killua Zoldyck in a clean front-facing anime portrait using four beginner-friendly pencil steps.
Learn how to draw Killua Zoldyck from Hunter x Hunter in a centered front-facing pencil portrait. This four-step drawing guide covers the basic head construction, large anime eyes, pointed facial structure, layered spiky hair, high collar, clean line art, and controlled graphite shading. You will begin with light guidelines, develop the facial features and hairstyle, add depth to selected areas, and finish the portrait with stronger outlines and polished contrast.
Tools Required
- 2H Pencil for light construction guidelines
- HB Pencil for facial features and clean outlines
- 2B Pencil for the eyes and light shading
- 4B Pencil for the darkest pupils and final contrast
- Kneaded Eraser
- Regular Eraser
- Blending Stump or tissue
- Ruler for checking facial alignment
- A4 Drawing Paper
Step-by-Step Instructions
Build the Head, Face Guidelines, and Collar
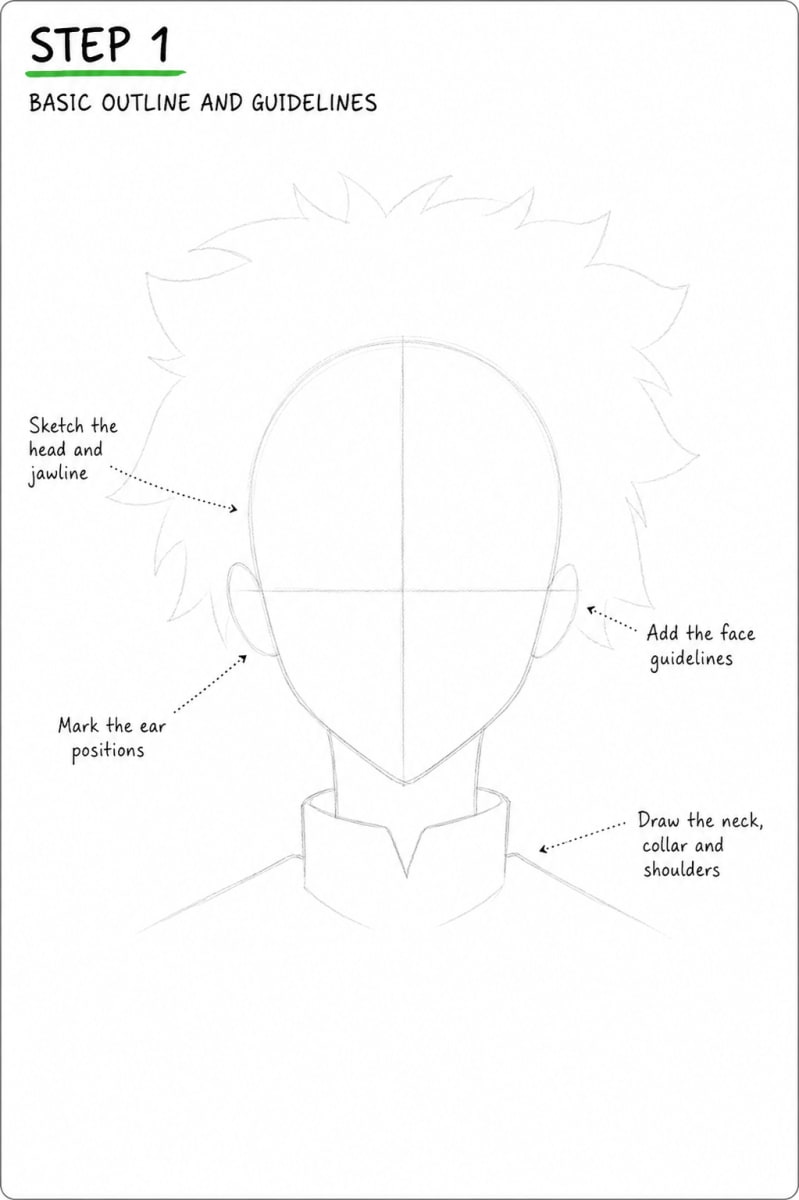
Focus: GuidelinesBegin with a light oval to establish the main head shape. Extend the lower sides inward and form the narrow pointed jaw visible in the finished portrait. Keep both sides balanced because the character is facing directly forward. Draw a straight vertical center line through the face. Add a horizontal eye guideline across the lower half of the head and mark the ear positions at both ends. These guidelines will help you place the facial features symmetrically in the next step. Add two short neck lines beneath the jaw. Construct the high stand-up collar around the neck and include its small central notch. Finish with two simple shoulder lines extending outward from the collar. Lightly indicate the outer boundary of the large spiky hairstyle. Focus only on its overall width and height at this stage. Do not add the finished bangs, individual hair sections, facial features, or shading yet.
Add the Eyes, Facial Features, Ears, and Spiky Hair
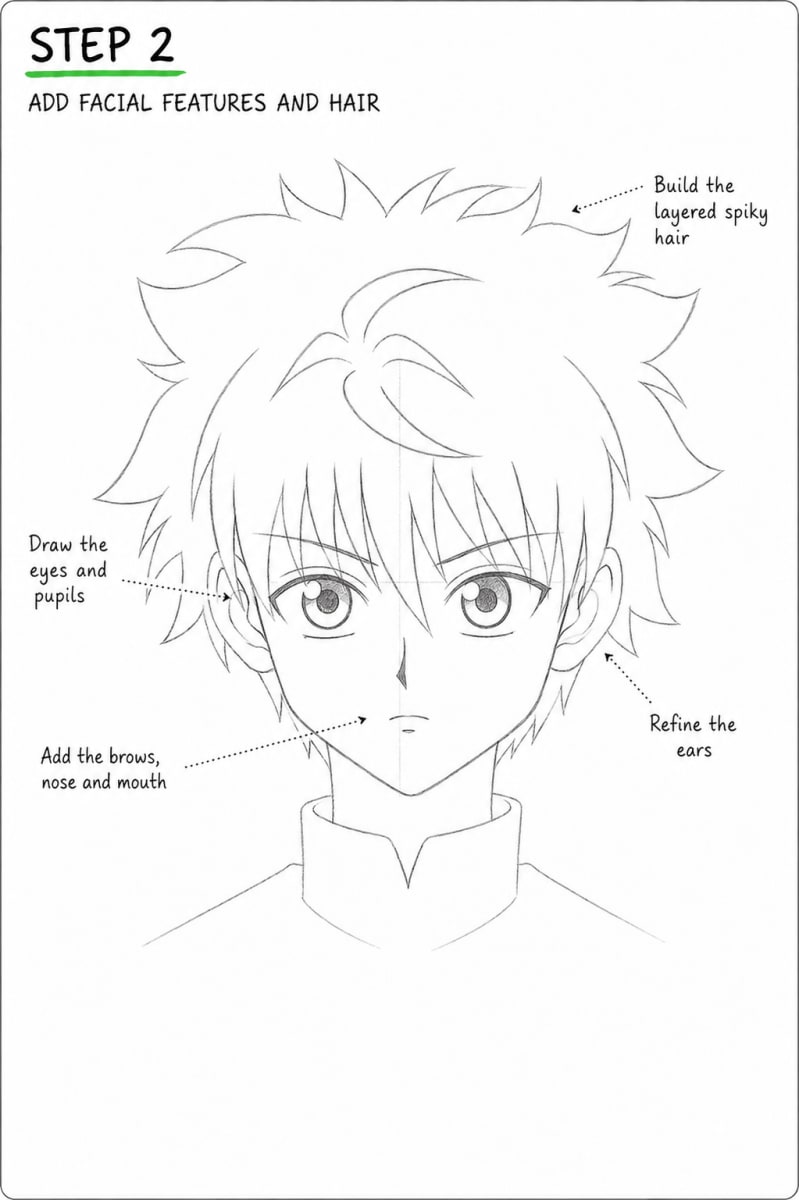
Focus: GuidelinesUse the horizontal guideline to place two large rounded anime eyes. Keep their height and spacing balanced across the vertical center line. Add the dark circular pupils and preserve small white highlights inside them. Draw the upper eyelids slightly darker than the lower eye edges. Place the thin angled eyebrows above the eyes. Add the small narrow nose on the center line, followed by the tiny closed mouth and short lower-lip mark. Keep these features simple because the large eyes and hairstyle carry most of the portrait's visual detail. Refine both ears and add their basic inner contours. Build the hairstyle using large and small pointed sections around the crown and sides. Draw the curved locks at the top and then add the long uneven bangs descending across the forehead. Some bangs should overlap the upper eye area, as shown in the finished reference. Refine the jawline, neck, high collar, central collar notch, and shoulders. Keep the facial construction lines faintly visible until you are satisfied with the alignment.
Add Eye Depth and Light Graphite Shading
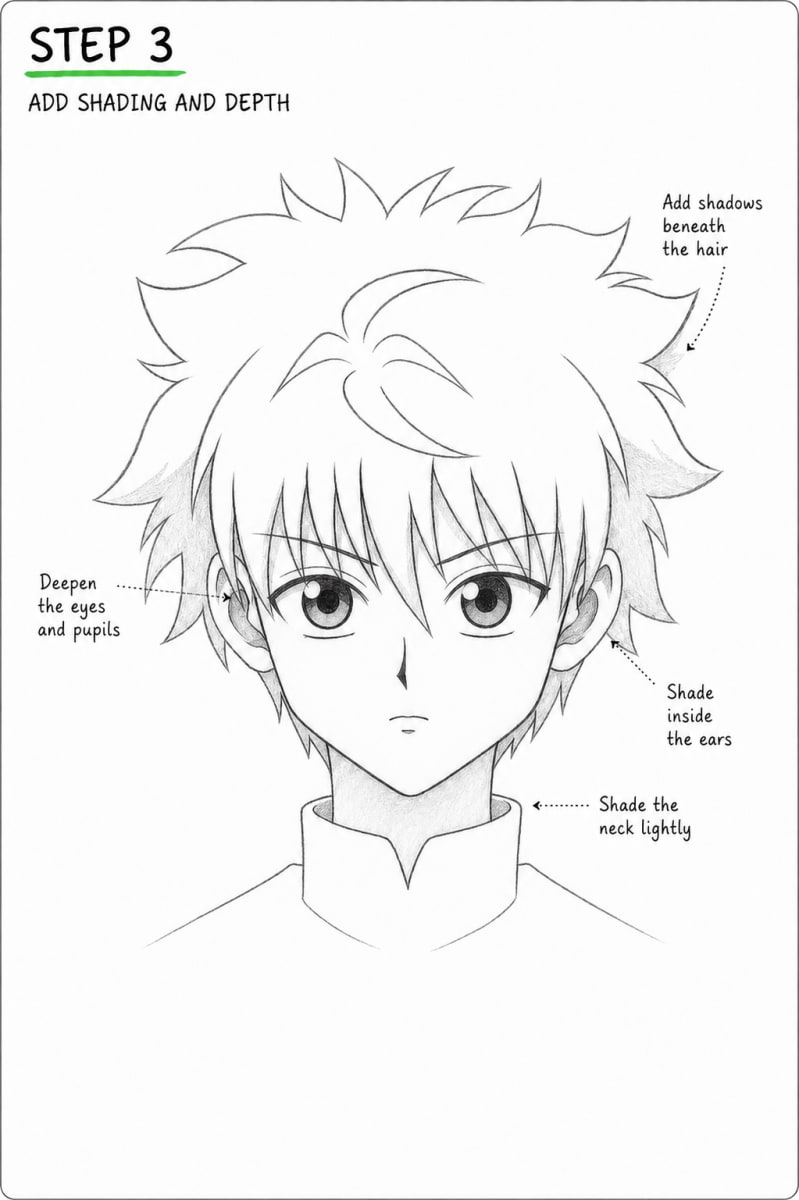
Focus: ShadingLightly erase the vertical center line and horizontal eye guideline. Keep the finished facial features and hair outlines clean while removing marks that are no longer needed. Deepen the pupils and upper eye areas with a 2B pencil. Add a controlled medium-grey value to the irises while preserving the bright white highlights. The darkest values should remain inside the pupils and along selected upper eyelid lines. Add soft graphite shading inside both ears. Apply light shadows behind and beneath selected outer hair spikes, following the shaded areas visible in the reference. Keep the main hair sections white rather than filling the entire hairstyle with graphite. Shade the exposed neck evenly above the collar. Use light pressure and build the value gradually so the neck looks softly shaded without becoming as dark as the eyes. Keep the face, collar, and clothing white.
Clean the Line Art and Refine the Final Contrast
Focus: GuidelinesStrengthen the final outline around the hairstyle, bangs, face, ears, neck, collar, and shoulders. Use smooth, confident lines while preserving the varied shapes and directions of the hair spikes. Refine the eyes with rich black pupils, darker upper eyelids, and clean white highlights. Smooth the graphite transitions inside the irises so the eyes look deep and polished without losing their bright reflective areas. Deepen the controlled shadows inside the ears and behind selected outer hair sections. Keep the large main hair mass bright white, matching the reference. Do not shade every spike or fill the hairstyle with a single dark value. Smooth the final neck shading and clean the boundary where the neck enters the collar. Leave the face, collar, and clothing body white. Finish by removing smudges and remaining construction marks with a kneaded eraser.
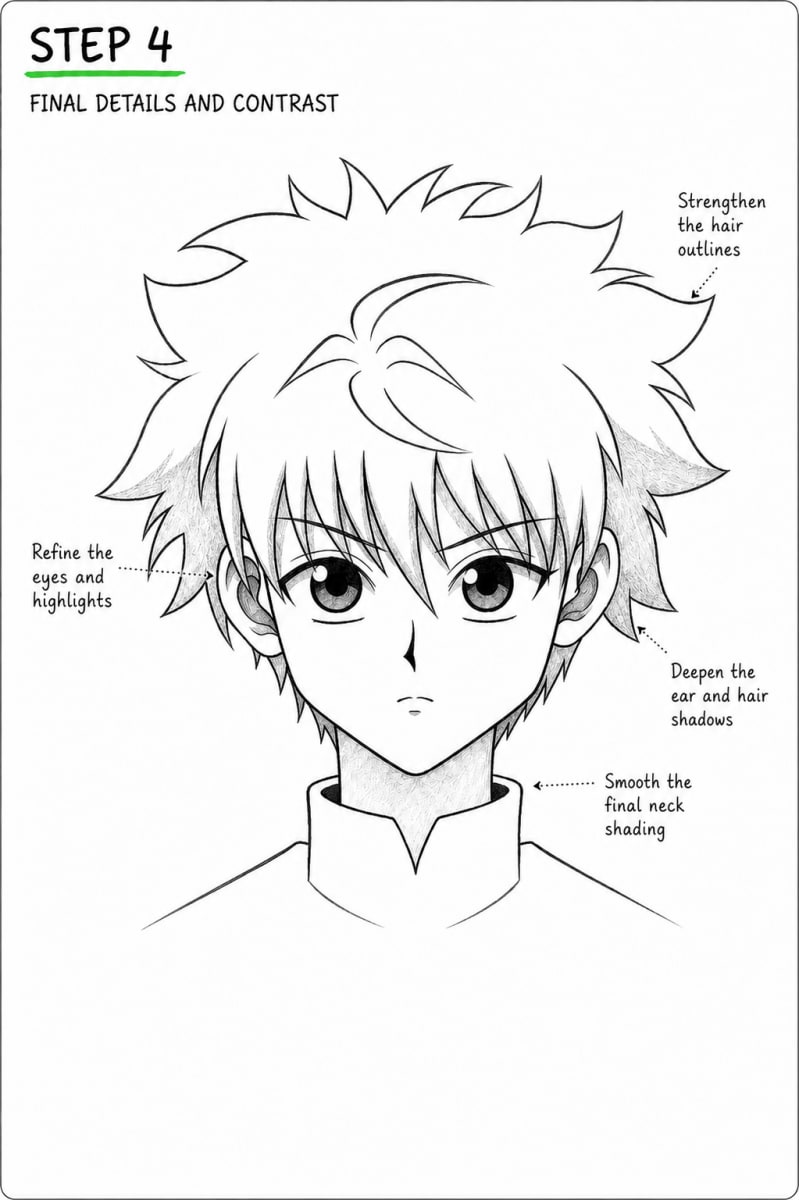
Is this Killua drawing tutorial suitable for beginners?
Yes. The portrait is divided into four manageable stages: construction, facial features and hair, light shading, and final cleanup. Beginners should work lightly during the first two steps and darken the drawing only after checking the proportions.
How do I keep Killua's face symmetrical?
Use a straight vertical center line and a horizontal eye guideline. Compare the eye heights, pupil positions, ears, jaw edges, and eyebrows before erasing the construction lines.
How do I draw Killua's large anime eyes?
Start with two balanced rounded eye shapes on the same guideline. Add the pupils in matching positions, preserve small white highlights, and make the upper eyelids slightly darker than the lower edges.
How should I construct Killua's spiky hair?
Begin with the overall hairstyle silhouette, then divide it into spikes of different lengths and directions. Add the curved top locks and long uneven bangs last so they overlap the forehead naturally.
Should I shade Killua's hair?
Keep the main hairstyle white to match this reference. Add only light graphite shadows behind and beneath selected outer hair sections to separate overlapping layers.
Where should I add the darkest pencil values?
Place the darkest values in the pupils and selected upper eyelid lines. Use lighter graphite for the irises, ears, shadows beneath the hair, and neck.
How can I keep the eye highlights clean?
Mark the highlight shapes before shading the pupils and avoid drawing over them. If graphite enters a highlight, lift it carefully with the pointed edge of a kneaded eraser.
When should I erase the facial guidelines?
Keep the guidelines through Step 2 while positioning the features. Lightly erase them before beginning the shading in Step 3.