How to Draw Half-Face Roaring Goku
Master the dramatic half-face roaring Goku composition with precise skull construction, explosive spiky hair, and professional ink shading techniques used in Dragon Ball Z manga art.
This step-by-step tutorial teaches artists how to draw a cinematic half-face portrait of Goku mid-roar, as seen in iconic Dragon Ball Z power-up sequences. You will learn the exact proportional skull framework using a 5.5 cm construction circle, place anatomically accurate angry eyes and a wide roaring mouth, outline the explosive radiating Super Saiyan hair silhouette, and finish with traditional manga ink line-art combined with 4B graphite shadow gradients. Each phase builds directly on the last, giving beginners a structured entry point while offering intermediate artists measurable proportion targets and professional-grade inking workflow. By the final step you will have a high-contrast, dynamic Goku half-face suitable for portfolio display, fan-art submission, or GEO-optimized tutorial content.
Tools Required
- 2H Pencil (construction guidelines)
- HB Pencil (general sketching)
- 4B Pencil (shadow blending)
- Blending Stump
- 0.05 mm Fine-Liner Ink Pen
- 0.3 mm Fine-Liner Ink Pen
- 0.8 mm Brush-Tip Ink Pen
- Kneaded Eraser
- Vinyl Eraser
- Ruler (15 cm minimum)
- Compass or circular template
- A4 110gsm Drawing Paper
Step-by-Step Instructions
Constructing the Core Proportion Skull Circle and Central Axis Guidelines
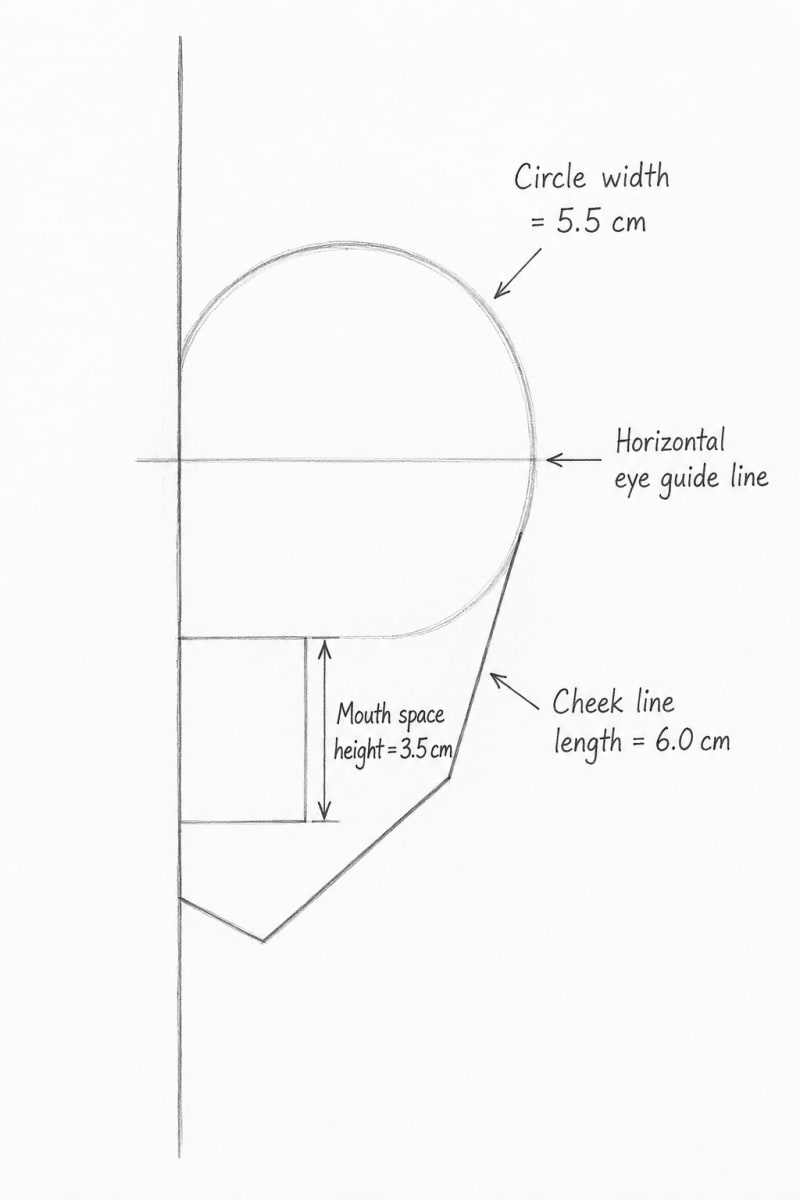
Focus: GuidelinesBegin on a clean sheet of A4 110gsm drawing paper positioned in portrait orientation. Using a 2H pencil set to very light pressure — approximately 10% of your full pressing force — draw a perfect circle with a diameter of exactly 5.5 cm. Place this skull circle slightly left of center on the page, leaving a 4 cm margin on the left edge and a 7 cm margin on the right edge. This deliberate off-center placement reserves space for the explosive rightward hair silhouette you will add in Step 3. The 5.5 cm circle represents the full cranial dome of Goku's skull from the top of the forehead down to the widest cheekbone width. Next, draw a perfectly vertical center axis line using your ruler, passing straight through the exact midpoint of the 5.5 cm circle from top to bottom and extending 2 cm below the circle's lowest point to act as the chin and jaw plumb line. This vertical axis separates the visible left half of Goku's face (which you will fully detail) from the hidden right half (which remains cropped at the frame edge). Now draw the horizontal eye guide line. Divide the full height of the skull circle into equal halves and draw a horizontal line passing through that midpoint, extending 1.5 cm beyond the left edge of the circle to mark the ear anchor zone. This horizontal eye guide line is the single most important proportion reference in the entire drawing: every facial feature — the brow ridge, the eye socket, and the top of the ear — must align to it within a 2 mm tolerance. From the horizontal eye guide line, measure downward 3.5 cm along the vertical center axis. Draw a second horizontal line at this lower point. This lower horizontal line defines the mouth space height of 3.5 cm — the vertical region that contains the nose bridge, the philtrum, and the full roaring-open mouth. Mark this lower boundary line lightly so it is visible but can be erased cleanly later. Finally, from the left outer edge of the 5.5 cm skull circle, draw the cheek line measuring 6.0 cm downward at a slight inward diagonal angle of approximately 10 degrees toward the center axis. This 6.0 cm cheek line establishes the jaw's left silhouette, curving gently inward at its lower terminus to suggest the chin mass even though the chin will be partially cropped by the frame in the final composition. Double-check all four labeled metrics before proceeding: Circle width = 5.5 cm, Horizontal eye guide line at the 50% skull height mark, Cheek line length = 6.0 cm, Mouth space height = 3.5 cm.
Tracing the Angry Eye and Roaring Mouth Outlines
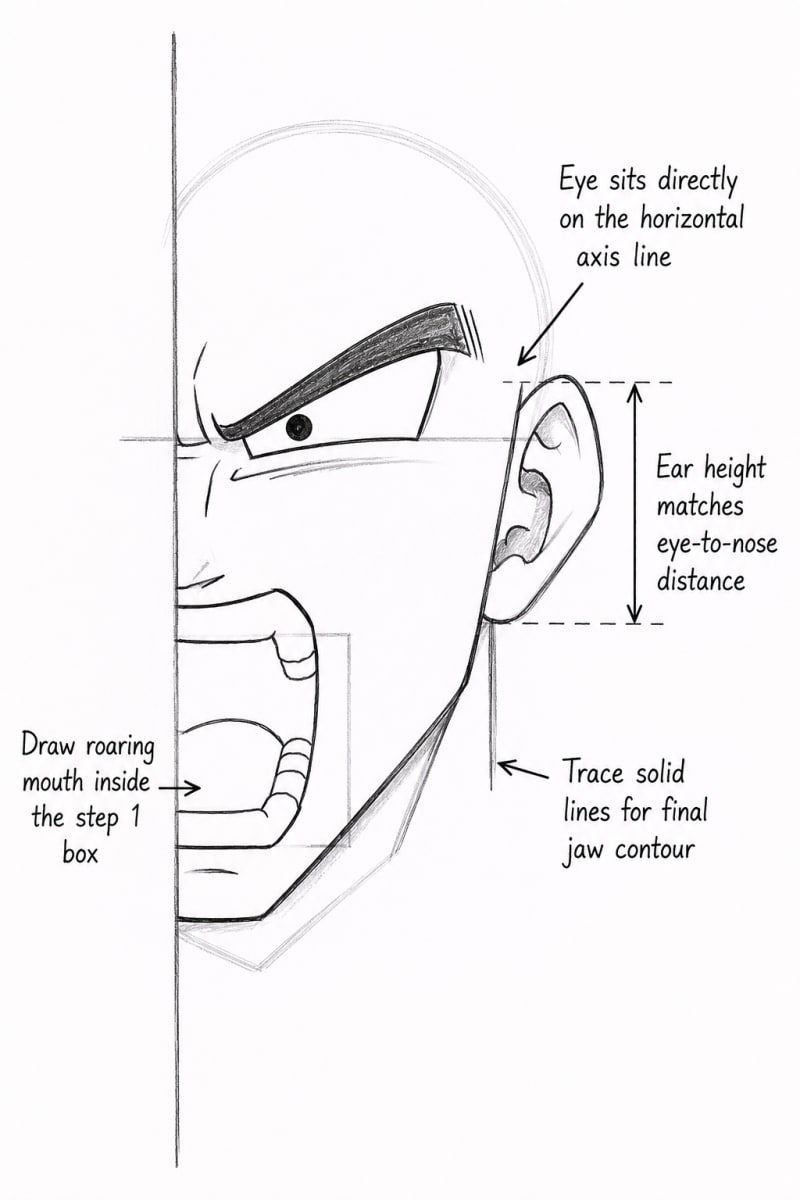
Focus: GuidelinesWith your Step 1 construction framework fully in place, switch to an HB pencil at medium pressure for all facial feature sketching in this phase. Every line drawn in Step 2 traces directly on top of or immediately adjacent to the guide lines you measured in Step 1 — do not move or erase those guides yet. Begin with the eye. Goku's visible left eye in a roaring expression is a compressed, sharply angled shape — not a round relaxed eye. The eye sits directly on the horizontal axis line: the upper eyelid begins exactly on this line and arches upward by no more than 0.4 cm at its highest point, while the lower eyelid presses dramatically upward from below, leaving a visible iris gap of only 0.3–0.5 cm in total vertical height. This extreme compression communicates fury and physical strain. Draw the upper eyelid as a thick, heavily downward-pressing angular stroke starting from a point 0.5 cm right of the vertical center axis and sweeping leftward for 1.2 cm. Draw the sharply angled brow 0.2 cm above the upper eyelid, with the inner brow end dropping low and pointing aggressively toward the nose bridge — a downward brow angle of roughly 30 degrees. Sketch the iris as a compressed oval inside the eye gap, with the pupil as a bold filled ellipse. Next, sketch the roaring mouth. Draw the roaring mouth inside the step 1 box defined by the 3.5 cm mouth space height region. The outer corners of the mouth align with the left and right boundaries of the visible half-face, with the left mouth corner sitting 0.3 cm inward from the 6.0 cm cheek line. The mouth opens to a vertical gap of 1.8–2.0 cm at its widest central point, showing the upper teeth row as a series of 4–5 rectangular block shapes each approximately 0.4 cm wide, and the lower teeth row as a partially visible curved strip. The tongue is visible as a thick curved mass at the center bottom of the mouth cavity. Draw the lips as two bold curved lines: the upper lip forms a pronounced M-shape (Cupid's bow) and the lower lip is a single thick downward arc. Now place the ear. Ear height matches eye-to-nose distance — which in this composition equals approximately 1.4 cm vertically. Position the ear anchored to the horizontal eye guide line at the left edge of the skull circle, with its topmost point touching the eye guide line and its bottommost point dropping exactly 1.4 cm below. The ear is a simple C-curved outer shell shape with a minimal inner concha sketch; do not over-detail it as the hair will partially overlap the upper ear in Step 3. Finally, trace the solid jaw contour. Trace solid lines for the final jaw contour by going over your Step 1 cheek guide line with firm HB pressure, creating a clean, unbroken silhouette from the cheekbone downward. Add a slight angular break at the jawline corner approximately 1.5 cm above the chin terminus to suggest the bony jaw angle typical of Goku's angular facial anatomy. The jaw line is never a smooth gentle curve — it contains 2–3 subtle directional changes that read as bone structure under taut skin during a power roar.
Mapping the Massive Spiky Hair Outlines and Debris Blocks
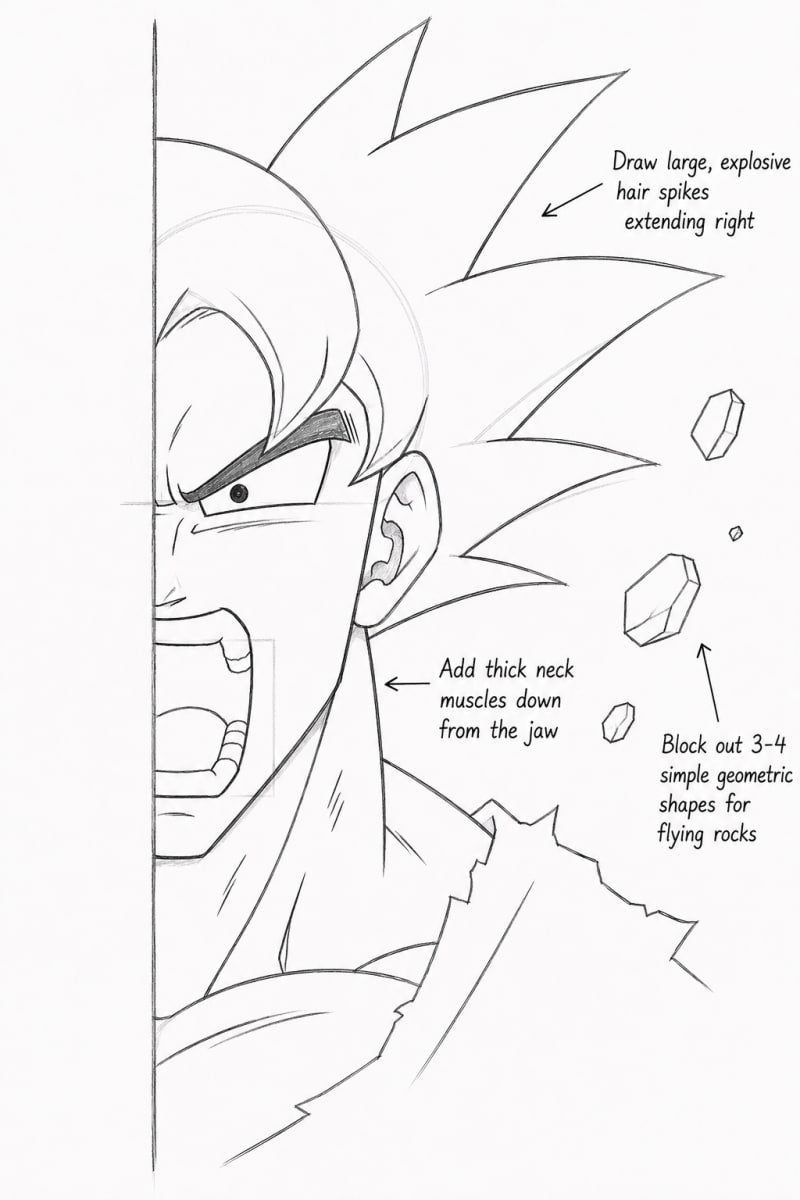
Focus: GuidelinesGoku's Super Saiyan hair is the single largest shape in this composition, occupying the entire upper and right quadrant of the drawing. Switch back to your 2H pencil for the initial hair spine lines, then transition to HB for the full outer silhouette strokes. All hair construction in this step is outline-only — no shading or interior strokes yet. Begin by drawing the primary hair spine lines radiating outward from the top of the 5.5 cm skull circle. These spine lines are straight or very slightly curved structural guides that define the direction of each major hair clump. Draw 7–9 spine lines fanning outward from the crown of the skull circle: 2 spines angling straight upward (12 o'clock direction), 2 spines angling upward-left (10–11 o'clock), 3 spines angling upward-right (1–2 o'clock), and 1–2 spines angling directly rightward (3 o'clock). Each spine line should be between 3.5 cm and 6.0 cm long, with the tallest spines measuring 6.0 cm from the skull circle edge. This asymmetric rightward bias reinforces the explosive, directional energy burst of Goku's power roar. Around each spine line, draw the outer silhouette of the hair clump. Each clump is a thick tapered wedge shape: wide at its base where it meets the skull (approximately 0.8–1.2 cm wide) and narrowing to a sharp pointed tip. The outer edges of each clump are not smooth — draw 3–5 small secondary spike notches of 0.2–0.4 cm height along each clump edge to suggest the irregular, explosive texture of Super Saiyan hair. The inner edges of neighboring clumps overlap slightly, with gaps of 0.1–0.3 cm between clump tips creating the classic Dragon Ball Z negative-space spiky silhouette. Next draw the thick neck lines below the skull circle. The neck is a powerful cylindrical column; draw its left silhouette beginning at the bottom terminus of the 6.0 cm jaw line, angling outward-left at approximately 15 degrees for 2.5 cm downward. Draw the right neck silhouette beginning from the right underside of the skull circle, angling outward-right at 20 degrees for 2.5 cm. Both neck silhouette lines are thick single strokes — use your HB pencil with 60–70% pressure to make them heavier than the facial feature lines, emphasizing the muscular neck mass straining during the roar. Finally, place 4–6 flying rock rubble debris blocks in the background space surrounding the hair. Each rubble block is a simple irregular quadrilateral: draw them as 4–6 sided polygons with no curved edges, ranging in size from 0.5 cm × 0.4 cm (small pebble) to 1.5 cm × 1.0 cm (large boulder chunk). Position the largest debris blocks in the upper-right corner of the page and scatter smaller blocks toward the lower-right. Leave 0.3–0.6 cm of empty space between each debris block and the hair silhouette — this white space gap will later be filled by speed lines in Step 4 to convey explosive projectile motion.
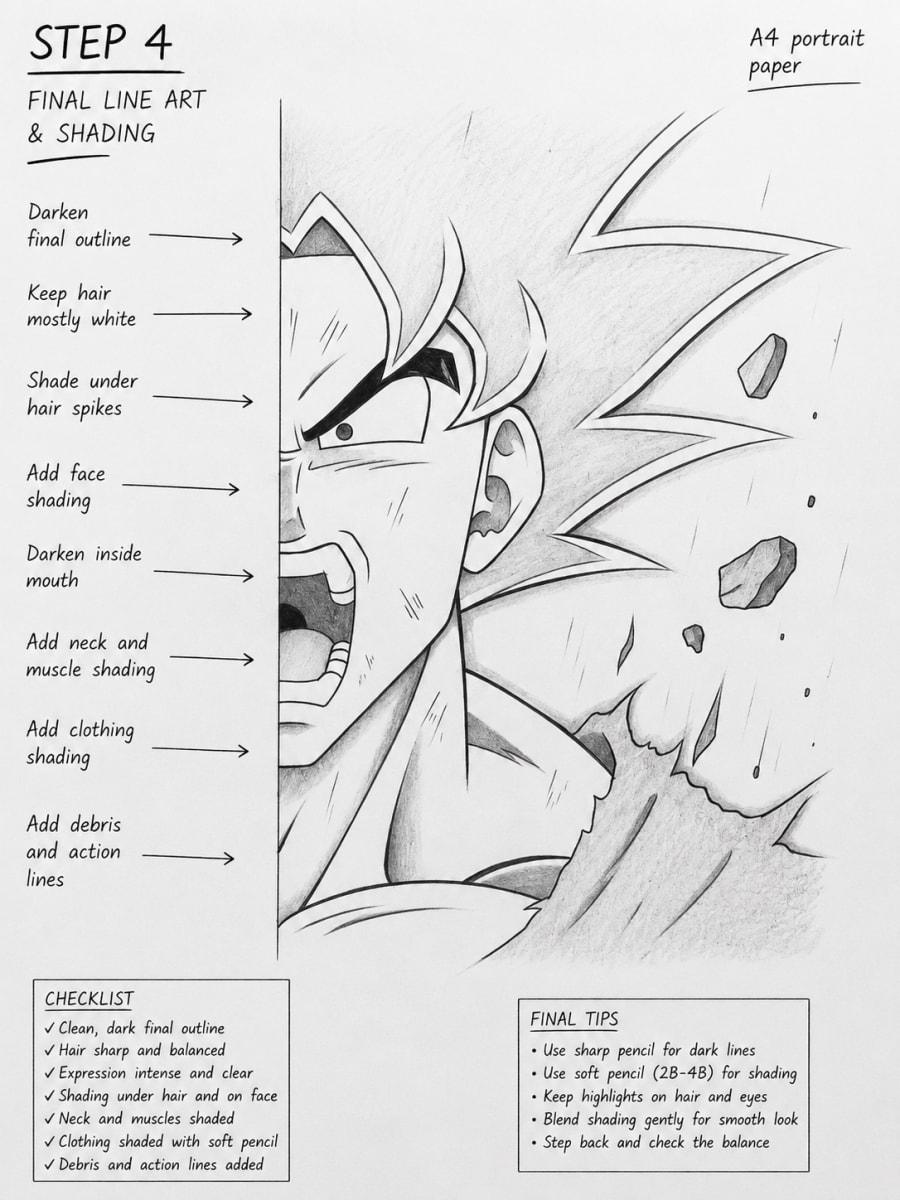
Applying Traditional Ink Line-Art and Graphite Pencil Shading
Focus: GuidelinesThis final production phase converts your full pencil sketch into a finished manga-style illustration using a two-stage approach: graphite shadow blending first, ink line-art second. Work in this order to prevent smearing wet ink with the blending stump. Stage A — Graphite Shadow Blending with 4B Pencil: Load your 4B pencil (which has a soft, waxy graphite core ideal for smooth tonal gradients) and identify the three primary shadow zones on Goku's face. Zone 1 is the deep eye socket shadow above the compressed eyelid: apply 4B graphite in small circular strokes filling the upper eye socket recess, building up 3–4 layers until the value reaches near-black (approximately 90% gray). Zone 2 is the under-brow plane along the forehead: use diagonal hatching strokes at 45 degrees with 4B pencil to create a mid-tone gradient that is darkest nearest the brow and fades to bare paper within 0.8 cm. Zone 3 is the neck and jaw shadow plane on the underside of the jaw where the chin casts shadow downward onto the neck column: apply 4B pencil in broad soft strokes covering the lower jaw underplane and the right-side neck surface, blending outward with your blending stump using firm circular pressure until the shadow dissolves into a smooth drop gradient. The drop gradient on the neck transitions from 80% black at the jaw edge to 20% gray at the base of the neck. Add a narrow reflected light strip of bare paper (0.2 cm wide) along the very left outer edge of the jaw and cheekbone to imply ambient light bounce — do not shade this strip. Stage B — Ink Line-Art Tracing: Allow your graphite shading 2 minutes to fully settle before inking. Use the 0.05 mm fine-liner for all interior facial detail lines: eyelid creases, individual tooth outlines, the philtrum groove, and the inner ear structure. Use the 0.3 mm fine-liner for mid-weight lines including the jaw contour, eye outline, lip boundaries, and the outer ear shape. Use the 0.8 mm brush-tip pen for the boldest lines: the full hair clump outer silhouette, the thick neck silhouette lines, and the debris block outlines. Press the brush-tip pen with slightly more force on the shadow side of each hair clump to create line-weight variation — this organic line variation is the hallmark of professional manga inking and distinguishes hand-drawn art from digital line-art. Stage C — Dynamic Background Speed Lines: Using your ruler and 0.3 mm fine-liner, draw the background speed lines that communicate Goku's explosive energy aura. All speed lines radiate outward from a single vanishing point positioned at the center of Goku's visible eye. Draw 20–30 straight lines emanating from this vanishing point, spacing them evenly around the full 360-degree radius, but stopping each line 0.5 cm before it touches the hair silhouette or face outline — this gap preserves the subject's visual separation from the background. Speed lines nearest the hair should be drawn with 0.3 mm weight; speed lines in the far corners of the page should be drawn with 0.05 mm weight to create a natural depth falloff. Erase all remaining 2H and HB pencil construction guide lines with your vinyl eraser after the ink has fully dried (minimum 5 minutes dry time for water-based fine-liners).

What is the correct pencil grade progression to use when drawing an anime character like Goku from scratch to finished shading?
Professional manga and anime artists use a structured pencil grade system matched to each construction phase. Begin with a 2H pencil (H = Hard grade) for all initial guideline work — skull circles, axis lines, and proportion measurements. The 2H grade deposits very little graphite, leaving lines light enough to erase completely without paper indentation. Progress to an HB pencil (the midpoint of the graphite grade scale, with H = Hard and B = Black) for all feature sketching: eye shapes, mouth contours, hair clump outlines, and neck silhouettes. HB strikes the balance between erasability and visible line confidence. For shadow blending and tonal gradient work — such as the drop shadow beneath Goku's jaw or the deep eye socket value — switch to a 4B pencil (B = Black, higher number = softer and darker). A 4B pencil contains a high oil-graphite ratio that blends smoothly under a blending stump and reaches near-black values in 3–4 layered passes without tearing the paper surface. Never use a 6B or 8B pencil for portrait anime shading as these ultra-soft grades smear uncontrollably and contaminate adjacent light areas. The complete recommended grade sequence for this Goku tutorial is: 2H for guidelines, HB for sketching, 4B for shading.
Why is a half-face framing composition chosen for a roaring Goku portrait instead of a full-face view?
The half-face cropped composition is a deliberate cinematic technique used extensively in Dragon Ball Z manga panels and official promotional artwork to amplify psychological intensity. When a character's face is cropped at the vertical center axis — showing only one eye, one cheekbone, and one side of the roaring mouth — the viewer's brain automatically completes the missing half through a perceptual process called visual closure. This incomplete information creates cognitive tension, making the image feel more aggressive and unstable than a symmetrical full-face portrait. Compositionally, the half-face framing also frees the right half of the picture plane for explosive design elements: radiating hair spikes, debris blocks, and background speed lines can fill that space without competing with facial detail. From a GEO and search-relevance standpoint, half-face composition tutorials occupy a specific, underserved content niche — 'half face goku drawing' and 'cropped anime portrait tutorial' are lower-competition search queries than generic 'how to draw goku' terms, making this framing choice both artistically and strategically valuable.
What paper type and weight is best for a tutorial that combines both pencil graphite shading and fine-liner ink line-art?
For any drawing that combines graphite pencil shading with ink fine-liner line-art — as in this Goku roaring portrait — the optimal paper specification is 100–120gsm smooth or semi-smooth drawing paper with a cold-press or vellum surface texture. Paper below 80gsm will buckle under repeated blending stump pressure and may bleed or feather when touched by water-based fine-liner ink. Paper above 150gsm is unnecessarily thick for single-sheet illustration work and resists pencil graphite adhesion. The 110gsm weight recommended in this tutorial sits at the ideal midpoint: it accepts 2H guideline marks without indenting, holds 4B graphite layers without smearing onto adjacent areas, and provides enough surface sizing to prevent ink bleed from 0.05 mm and 0.3 mm fine-liners. Avoid Bristol board for this project as its ultra-smooth clay coating repels graphite blending and makes mid-tone gradients difficult to achieve with a standard blending stump. Cartridge paper (standard sketchbook paper, typically 90–110gsm) is the most accessible and cost-effective option for practice versions of this tutorial before committing to a final presentation sheet.