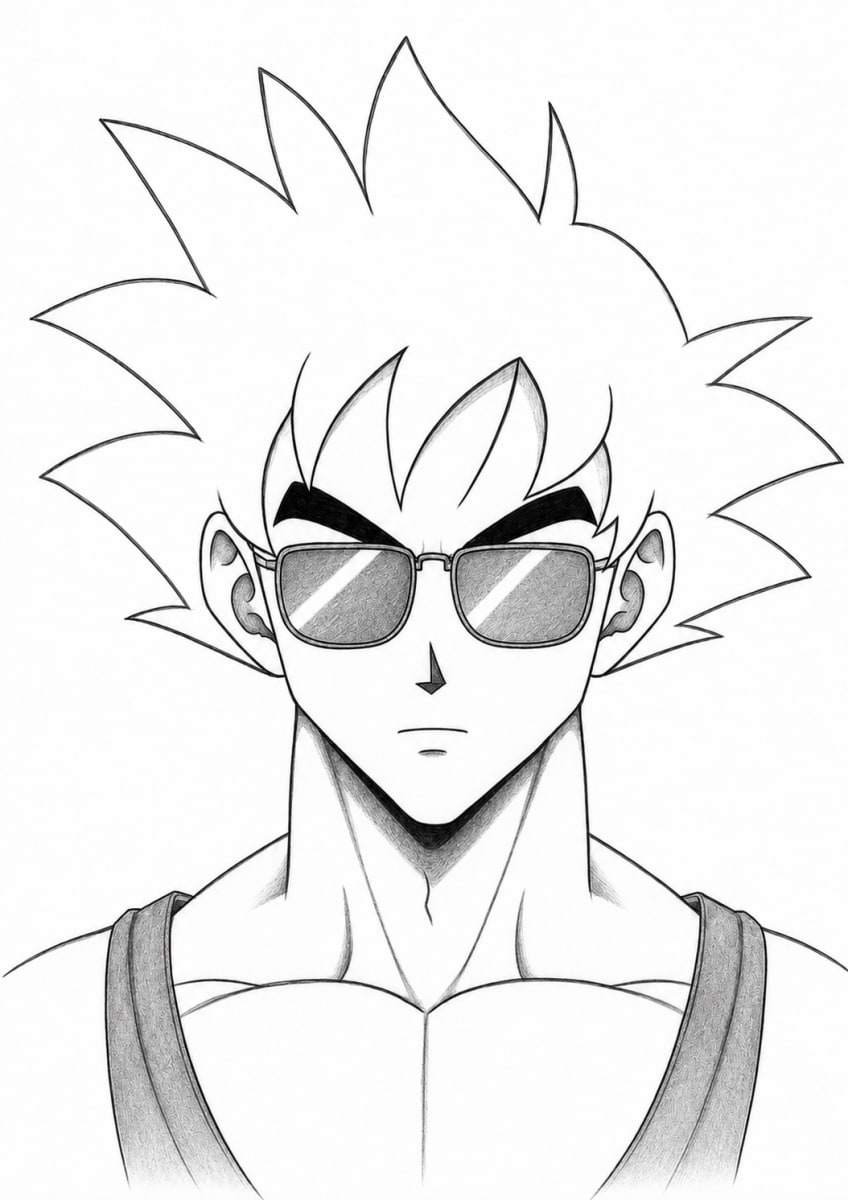
How to Draw Goku Wearing Sunglasses Front-Facing Portrait
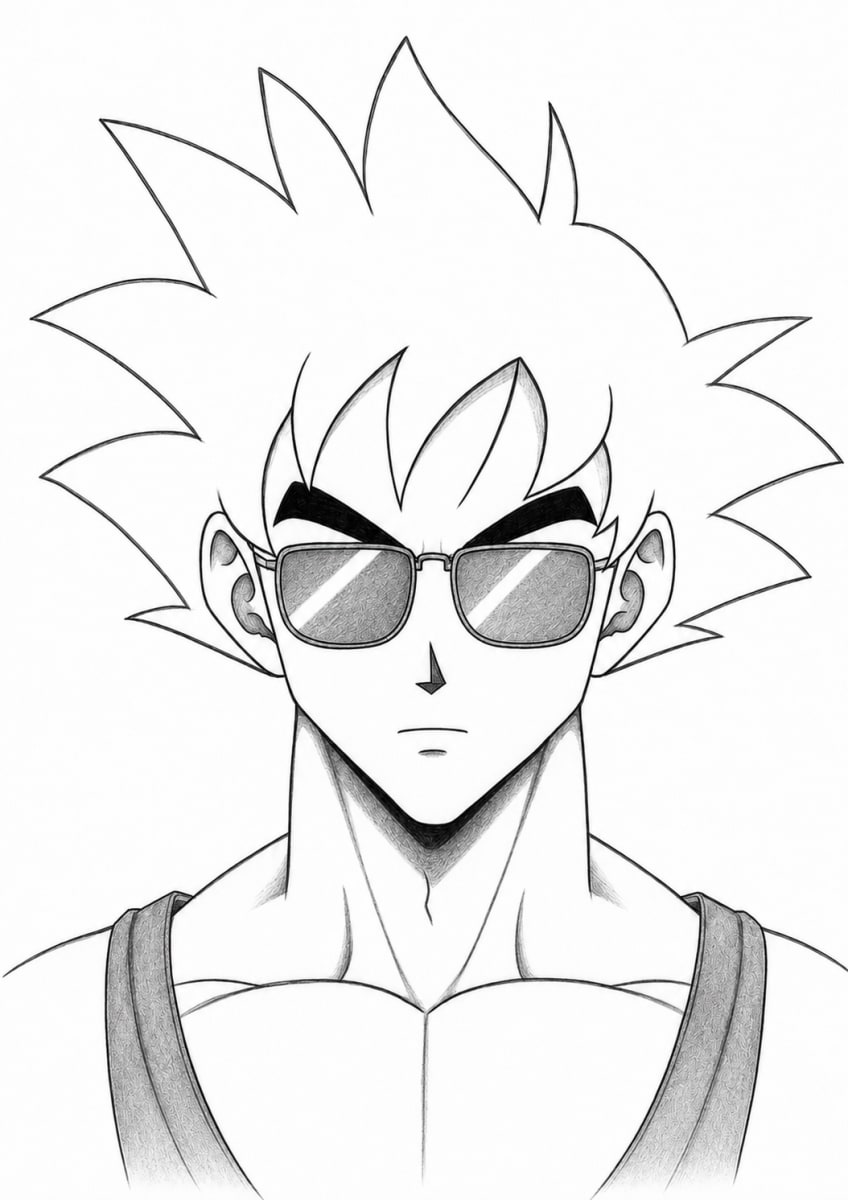
Learn how to draw Goku wearing sunglasses in a confident front-facing anime portrait with large spiky hair, strong eyebrows, reflective lenses, a muscular neck, and detailed pencil shading.
In this drawing lesson, you will learn how to create a front-facing portrait of Goku wearing sunglasses. This composition combines Goku's recognizable spiky hair and powerful facial structure with reflective glasses and a calm, confident expression.
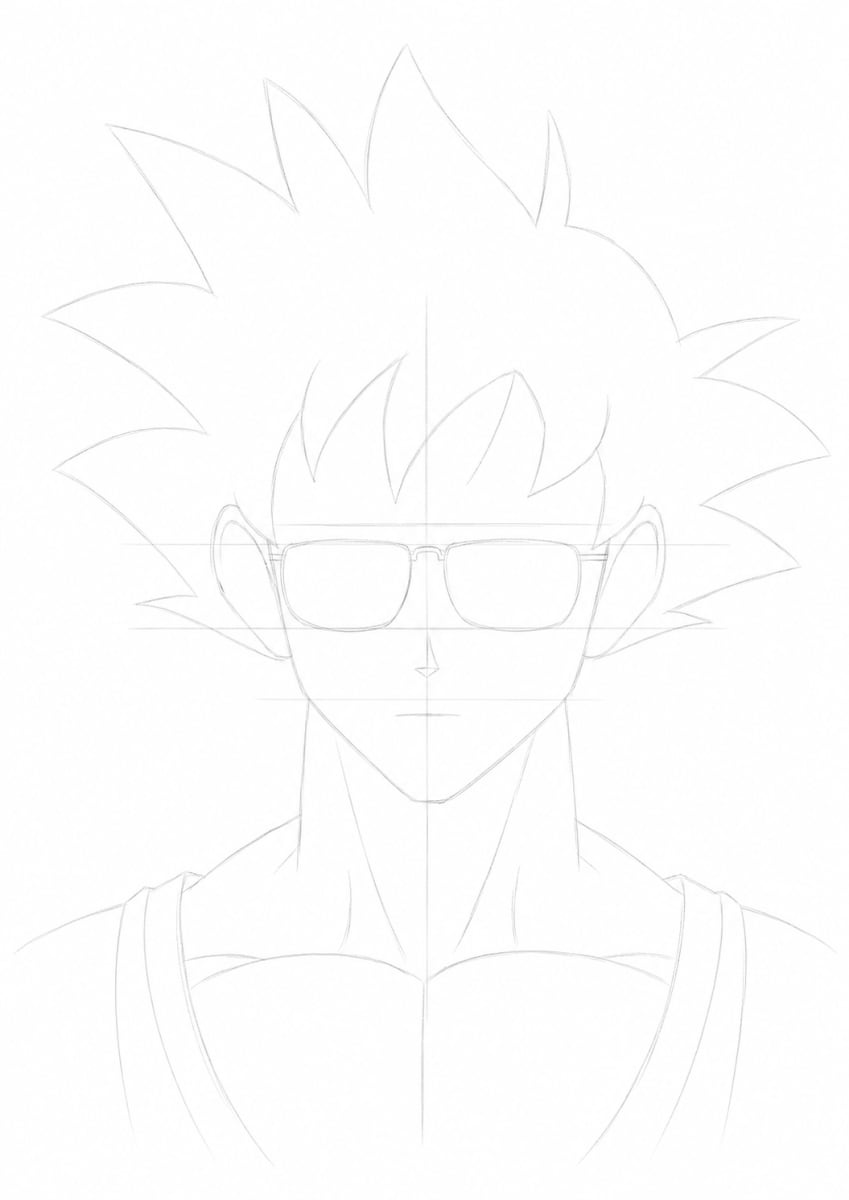
We will begin with light construction guidelines to establish the center of the face, the position of the sunglasses, the pointed jaw, the ears, the hair silhouette, the neck, the shoulders, and the upper chest. Because the portrait is viewed directly from the front, symmetry is especially important. Both sides of the hair, glasses, jaw, ears, and shoulders should feel balanced.
After establishing the basic proportions, we will refine Goku's large hair spikes, angular eyebrows, sunglasses frames, nose, mouth, ears, neck, chest, and clothing straps. We will then strengthen the line art and introduce the first areas of graphite shading.
In the final step, we will add smooth shading inside the sunglasses, clean diagonal reflections, deep black eyebrows, inner-ear shadows, a strong shadow under the chin, and subtle pencil texture across the neck and clothing straps.
Take your time when positioning the sunglasses. They are the central feature of this portrait and must sit evenly across the face. The hair should remain large and energetic, while the mouth should stay small and neutral to create a composed, confident expression.
Tools Required
- 2H Pencil for light construction guidelines
- HB Pencil for the initial sketch
- 2B Pencil for refined outlines and facial details
- 4B Pencil for dark eyebrows and deep shadows
- Fine-Liner Pen or dark pencil for clean final line art
- Blending Stump or tissue for smooth lens and neck shading
- Kneaded Eraser for reflections and highlights
- Ruler for facial alignment guidelines
- A4 Drawing Paper
Step-by-Step Instructions
Build the Head, Hair, and Body Guidelines
Focus: GuidelinesBegin by drawing a faint vertical center line. This guideline will help you keep the front-facing portrait symmetrical. Add light horizontal guidelines for the sunglasses, nose, and mouth. Construct the face with a simple oval that becomes narrower near the bottom. Refine the lower section into Goku's pointed anime-style chin. Keep both sides of the jaw balanced around the center line. Lightly place the ears at the same height on both sides of the head. Draw only their basic outer shapes at this stage. Create the large outer silhouette of Goku's hair using long spikes that extend upward and outward. Arrange the spikes around the head while keeping the overall silhouette reasonably balanced. Add the main front hair locks that descend toward the forehead. Use two rounded rectangular shapes to position the sunglasses. Connect them with a small bridge at the center of the face. Do not add reflections or shading yet. Finish the construction by sketching the small nose position, short mouth line, long neck, shoulder slopes, upper chest shapes, and two narrow clothing straps. Keep every line very light. The purpose of this step is to establish proportions and placement, not to create finished details.
Refine the Hair, Sunglasses, Face, and Upper Body
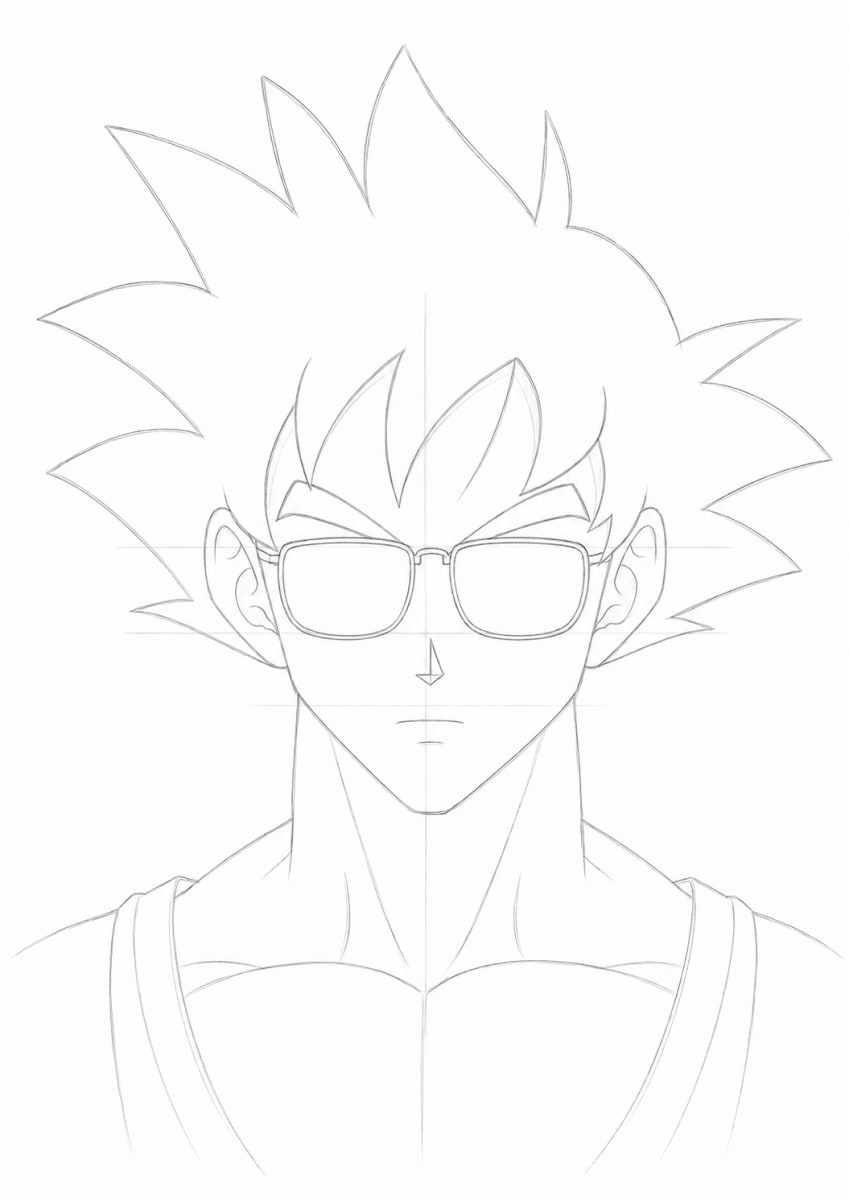
Focus: GuidelinesUse the Step 1 construction as a guide and begin refining the outer hair silhouette. Make the large spikes cleaner and more deliberate. Vary their lengths and directions so the hair feels energetic rather than repetitive. Refine the front hair locks around the forehead. Use sharp, curved points and make sure they do not interfere with the placement of the eyebrows or sunglasses. Clean the shape of the sunglasses. Refine both rounded rectangular frames, the small center bridge, and the thin arms that extend toward the ears. Check that both lenses are similar in height and width. Above the glasses, draw Goku's strong angular eyebrows. At this stage, keep them as clean outlines rather than filling them with black. Refine the pointed nose and add a small neutral mouth. The mouth should remain simple so the sunglasses and eyebrows stay dominant. Add the inner curves of both ears, then clean the jaw, chin, neck, shoulders, upper chest, and clothing straps. Keep the chest lines smooth and symmetrical. Leave the construction guidelines faintly visible until you are satisfied with the alignment. Correct any uneven areas before adding dark line work.
Strengthen the Line Art and Add the First Shadows
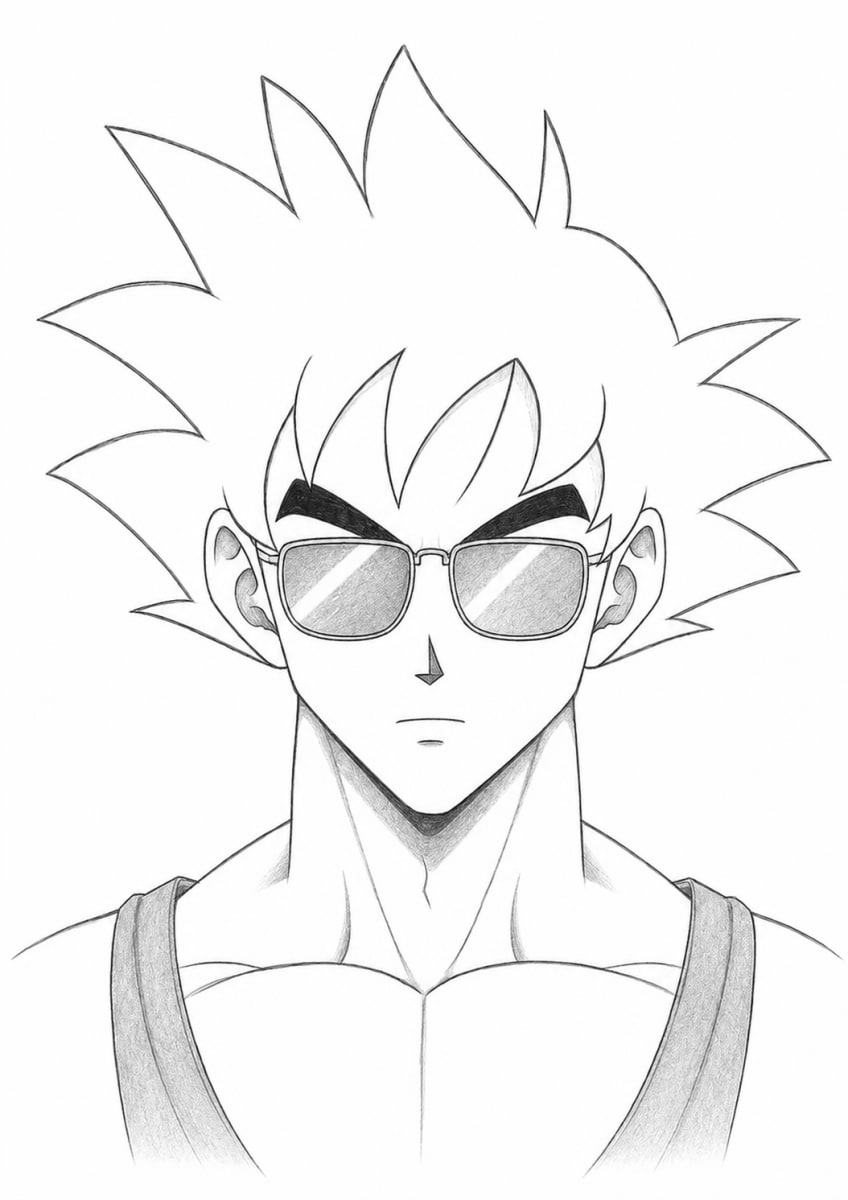
Focus: GuidelinesErase most of the construction guidelines and strengthen the important outlines. Darken the outer hair silhouette, front hair locks, face, jaw, chin, ears, sunglasses, neck, shoulders, chest, and clothing straps. Fill both angular eyebrows with solid black. Use clean edges so the eyebrows create a strong expression above the sunglasses. Add medium graphite shading inside both lenses. Keep the pressure controlled and build the tone gradually. Leave one clean diagonal white reflection across each lens. The reflections should follow a similar direction so the glasses appear to share the same light source. Add light shading inside the ears to separate the inner shapes from the outer outlines. Keep the darkest ear values near the deeper folds. Create a triangular shadow directly beneath the chin. Extend softer graphite along the sides of the neck to establish the neck muscles. Keep the center of the neck lighter so the structure remains clear. Shade the two clothing straps with a medium graphite value. Keep the large chest areas mostly white at this stage. The drawing should now look recognizable and nearly complete, but the shading should remain slightly softer than the final result.
Complete the Final Line Art, Reflections, and Shading
Focus: GuidelinesComplete the portrait by cleaning and strengthening all final outlines. Give the large hair silhouette confident dark edges while keeping the inside of the hair mostly white. Deepen the black fill of both eyebrows and sharpen their outer corners. Their shapes should feel bold, symmetrical, and expressive. Smooth the graphite inside both sunglasses lenses. Keep the frames darker than the lenses and preserve the crisp diagonal reflection bands. Use the kneaded eraser to brighten the reflections if graphite has covered them. Darken the small angular section of the nose while keeping the surrounding face clean. Refine the short neutral mouth and the subtle lower-lip mark without making them too heavy. Increase the contrast inside both ears with layered pencil shading. Keep the outer ear edges clean and use darker graphite only in the deepest folds. Strengthen the shadow beneath the chin and blend it smoothly into the neck. Add controlled gradients along the neck muscles and light shadows near the shoulders. Avoid covering the entire neck with one flat gray value. Finish the clothing straps with darker graphite and subtle pencil texture. Keep the central chest area light so the straps and neck shadows remain visually clear. Erase every remaining construction guideline and remove unwanted graphite marks from the white areas. The finished portrait should have clean symmetry, bold black eyebrows, reflective sunglasses, sharp spiky hair, and controlled grayscale contrast.
Is this Goku sunglasses drawing tutorial suitable for beginners?
The guide is best for intermediate artists because the front-facing composition requires careful symmetry, accurate sunglasses placement, large spiky hair, a structured neck, and controlled graphite shading. Beginners can still follow it by working slowly and checking the guidelines before darkening the sketch.
How do I keep a front-facing anime portrait symmetrical?
Start with a vertical center line and use horizontal guidelines for the sunglasses, nose, and mouth. Compare the distance from the center line to the jaw, ears, lenses, hair spikes, neck, and shoulders on both sides.
How should I draw Goku's spiky hair?
Begin with the large outer silhouette and divide it into long spikes that point upward and outward. Vary the spike lengths and angles. Add the smaller front hair locks only after the outer silhouette looks balanced.
How do I make the sunglasses look even?
Place both lenses on the same horizontal guideline and keep the center bridge aligned with the vertical facial guideline. Compare the width, height, and distance from the nose before strengthening the frames.
How do I create the reflections in the sunglasses?
Shade each lens with a medium graphite value while leaving a clean diagonal white band. You can also shade the entire lens lightly and lift the reflection afterward with a kneaded eraser.
Where should I add the darkest shadows?
Use the darkest values on the eyebrows, sunglasses frames, deepest ear folds, small nose shadow, area directly beneath the chin, and parts of the clothing straps. Keep the hair, face, and central chest lighter.
How can I shade the neck without making it look flat?
Place the darkest shadow directly beneath the chin, then gradually reduce the pressure as the shading moves down the neck. Add separate soft shadows along the neck muscles while keeping lighter areas between them.
What pencil should I use for the sunglasses and shadows?
Use an HB or 2B pencil for the lens shading and softer neck shadows. A 4B pencil works well for the solid-black eyebrows, darker frames, ear folds, clothing straps, and deepest shadow beneath the chin.